
Glance Company Settings
At the top of Glance Company Settings are the main settings for the package. It also includes some options to configure single sign-on, and which Glance buttons you want available to your agents.
There are five sections on the Glance Company Settings tab:
- Settings: Choose your default admin and set session preferences.
- Single Sign On: Manage how your users authenticate with Glance.
- Presence Settings: Enable a button that lights up when a customer is present on your website.
- Glance Buttons: Choose which buttons display on which objects in Salesforce.
- Glance for Salesforce Users: Manage which users are enabled with Glance.
Prerequisites
Before modifying Settings, verify that:
- You are the administrator for your Glance account.
- You have entered your Glance username and password on the Glance User Settings tab in Salesforce.
Settings
Choose your default admin and set session preferences.

To configure your Glance settings:
-
From the Salesforce app, click the Glance Company Settings tab at the top.
-
Click Edit.
-
Under the Settings section, complete the following steps:
-
For Default Glance Admin, choose which Salesforce user is an admin for your company’s Glance account.
-
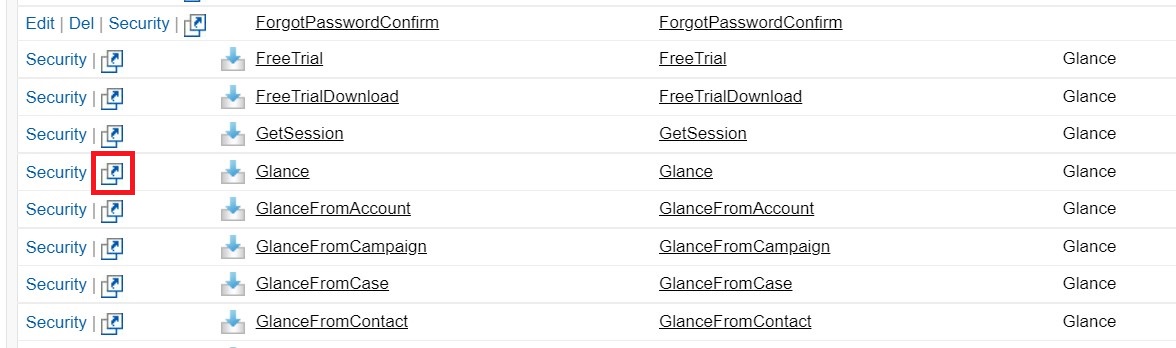
For VisualForce Base URL, enter the Visual Force Domain. You can find this value through the following instructions:
- Go to Setup (gear icon) > VisualForce Pages.
- Search for ‘Glance’.
NOTE: There are a few glance-related VisualForce pages, so make sure you select the one called simply ‘Glance'.
- Click the preview icon to the right of Security, this will display the link to the VisualForce page in a new tab.
- Copy only the
.force.compart of the URL, no trailing slash.
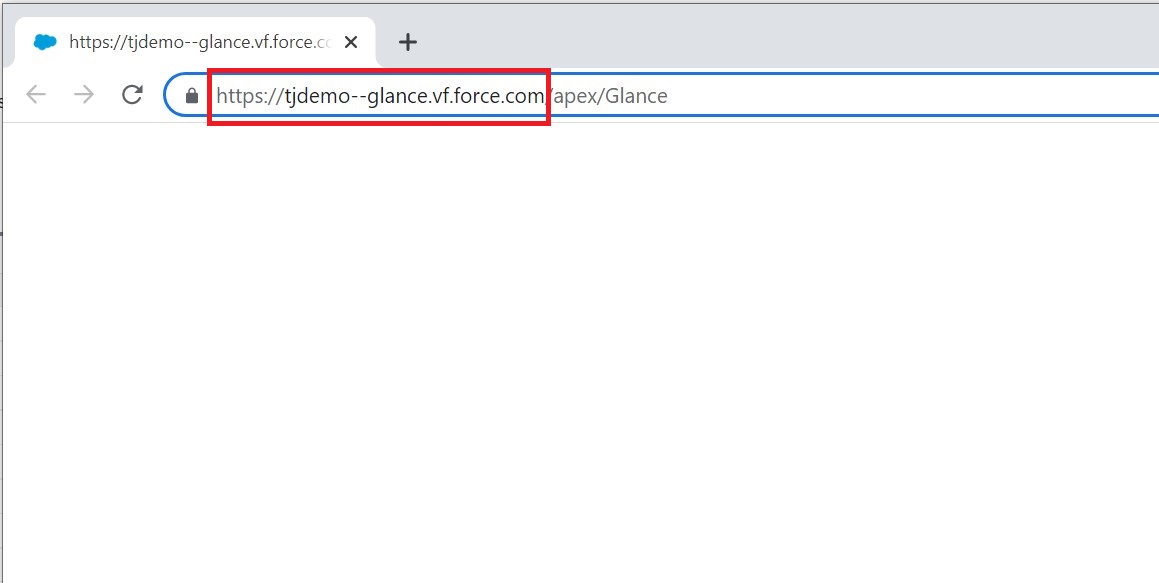
- Navigate back to the Glance Company Settings page and paste the value into the VisualForce URL Field. For example,
https://test--glance.vf.force.com.

NOTE: Salesforce enhanced domain changes can take up to 24 hours to take effect. Due to this timing, Glance recommends that you enable Enhanced Domains in your Salesforce organization first, then configure and test Glance domain changes over the weekend, or during non-critical business hours.
-
For Lightning Base URL, only complete this step if you added the VisualForce Base URL above and received the following error message when running Glance Sessions: "Error: Glance Has Not Fully Loaded. Ensure that Lightning Domain is added to the whitelisted domains".
- Locate the Lightning Domain URL by going to a case/contact.
- Copy and paste this value into the Lightning Base URL field.
-
For Create Leads for Session Guests, choose how you want leads created. These options only apply to screen share sessions:
- Never: This option does not create any new Leads for session guests.
- Who Provide a New Email: This option creates a new Lead for any guest who provides an email address when joining. A new Lead will only be created if there is no existing Lead with that same email address.
- Who Provide a New Email and Name: This option creates a new Lead for any guest who provides both an email address and name.
-
For Log Sessions Started Outside of Salesforce, Select this option if your team is using the Glance client to join / start a session.
-
For Open Glance Session Records, select this option if you want the user to immediately capture notes in Salesforce during their session or relate the session to other records.
-
For Sync Frequency, choose how often updates occur: Hourly, Every 2 hours, Daily, or Never. Synchronization happens relative to the time you first installed the Glance for Salesforce package.
- For example, If you install the package at 1:14 p.m. and you synchronize every hour, synchronizations will occur at 2:14 p.m., 3:14 p.m. and so on.
- You may run synchronization jobs manually from the Glance Sync History page, which is located on the Glance for Salesforce navigation bar.
- Select the tab, click the Sync Now button, and click Refresh. Next Sync displays the date and time of the next scheduled sync.
-
For Chatter When Starting Glance Session, select this option if you want started or joined Glance sessions posted into the Chatter feed of anyone following that record. The automatic notification includes a link to the session that Chatter users can click to join from any desktop, tablet, or mobile device.
-
For Debug Mode, select this checkbox if you need to debug the Glance Package. After you enable this setting, you can see logs for Glance sessions from the App Launcher > Logs. When you have finished debugging, de-select this checkbox.


- Click Save.
Single Sign-On (SSO)
Starting in package version 3.13 or later, Glance supports using SAML in addition to the existing login key method for SSO authentication.
NOTE: SAML SSO is not supported for SHOW and VIEW sessions.
The preferred and most secure way for authentication is through SAML. To enable SSO in Glance for Salesforce:
-
If using SAML, then:
- Configure your Glance group to use SAML. More information on setting up a SAML sign-on is available here.
- If using presence, you will need to create a least-privileged agent account within the group on glance.net. From within the Account Management area of glance.net, create a user account with a PUID but no other Glance permissions. This will be your Non-Admin Partner User ID - see below.
-
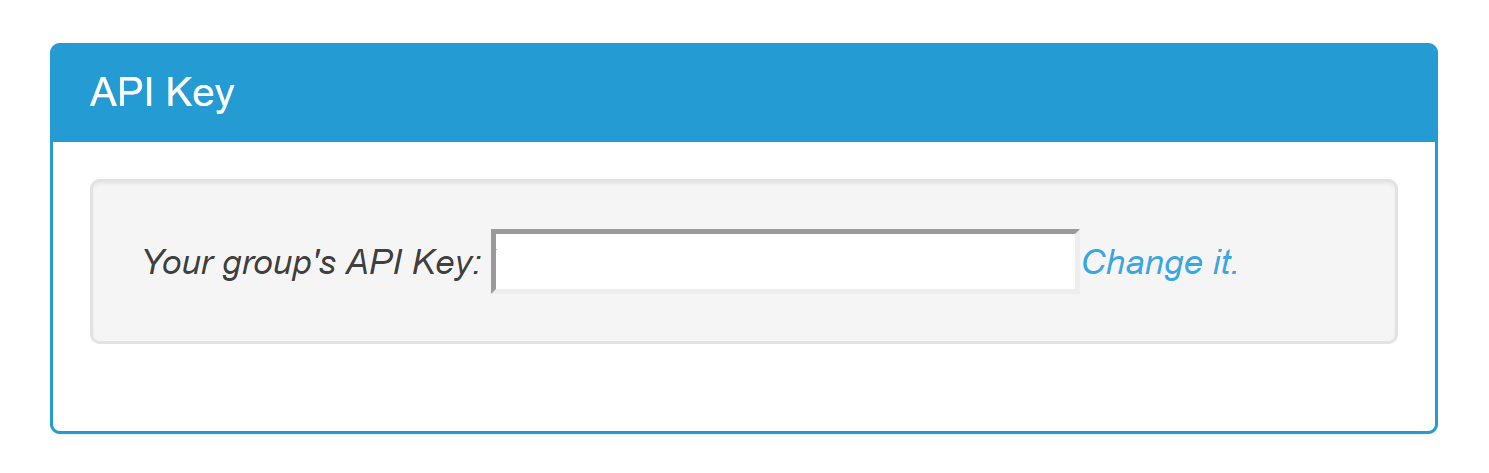
Obtain a glance API key. Navigate to https://www.glance.net/Login.asp and log in to your Glance account.
-
Go to the Settings tab and scroll to the API Key section at the bottom of the page.
-
Copy your API key.
-
From the Salesforce app, click the Glance Company Settings tab at the top.
-
Click Edit.
-
Scroll to the Single Sign On section.
-
For SSO, select SAML 2.0 or Login Key from the drop-down menu.
-
For Partner User ID Field, choose a value from the drop-down. The PUID must be available on the User object in Salesforce, must be unique to each user, and must match the value in the PUID field for the user's account within the Glance system (see the PartnerUID field here). It is also common to use a value in the user's FederationID field.
-
If you selected SAML 2.0 for your SSO mechanism, enter the Non-Admin Partner User ID mentioned above in the text field.
-
For API Key, enter your API Key you obtained earlier from your Glance account.

-
For SSO Login Expiration, choose how frequently you want the login key to expire. The default is 3,600 seconds, which is one hour.
-
Scroll to the top and click Save.
If you are unable to use SAML or Login Key for SSO, every user must sign in with their Glance address and password from the Glance User Settings page. This can be found at the top of the Glance for Salesforce application next to Glance Company Settings. If you are using Cobrowse without any client software, your agents will also need to keep a browser tab open and stay signed into their Glance account. We have a page for this that can be found at www.glance.net/account/accountkeepalive.aspx.
Presence
From the Presence Settings section, you can enable Presence within Salesforce so that the Join button lights up when your customer is present on your website. When the button lights up, the agent can connect with the customer with one click. For more information, see 1-Click Connect Requirements.

To enable presence:
- From the Salesforce app, click the Glance Company Settings tab at the top.
- Click Edit.
- Scroll to the Presence section.
- Select Enable Presence.
- If you want the visitor to receive a prompt in their browser window to accept before the Cobrowse session starts, select Show Terms To Visitor Before Connecting.
- Click Save.
Glance Buttons
This section controls which buttons appear in the Glance Lightning Component when it is on a record. These settings also apply in Classic when the Lightning Component is wrapped in a VisualForce page. By default, most buttons are enabled for Cases, Contacts, Leads and Opportunities.

To modify Glance button settings:
- From the Salesforce app, click the Glance Company Settings tab at the top.
- Click Edit.
- Scroll to the Glance Buttons section.
- If you want to modify an existing button configuration:
- For Object, choose which object you want to configure the Glance buttons for. The options in this list are determined by which Lookup fields are on the Glance Session object.
- For Show, select this option if you want the Show button to appear or not. Show enables your Glance user to show their screen and can invite anyone to join.
- For Join, select this option if you want the Join button to appear or not. Join allows your Glance user to join Cobrowse and Screen Share sessions started by customers on your website, on their desktop, or in your mobile app.
- For Video select this option if you want to start a video session. More information on configuring this feature is available here.
- For Visitor ID Object, choose which object the visitor ID is located from. You can choose the object you are configuring Glance on or any parent object. You should only modify this this menu if you are configuring join sessions with 1-Click Connect through Glance’s Presence service.
- For Visitor ID Field, choose the field to use for the visitor ID from the Object you defined in the Visitor ID Object setting. If no Visitor ID is selected, the Join button will default to asking your user for a session key.
- For Auto Join, select this option if you want users to automatically connect to any in-progress Glance session when they load the record in Salesforce. This is used in cases where Glance is fully integrated into the call center experience. This option is currently only supported for Cases. For more information, contact Glance.
- If you want to configure Glance for another object, at the top of the section click Add.
- Click Save.
For instructions on setting up Cobrowse on your website to join a session through CRM integration, please review the Cobrowse User Guide and the Cobrowse Customizing section.
Profile Settings
The section describes how to configure and enable Profiles to use Glance.
If you are provisioning users for the first time, go to the Granting User Access section. If you are provisioning additional users or modifying existing user settings, go to the Add Permission Sets section.
Granting User Access
To enable Glance for your users, you need to:
- Modify Profile Settings to grant profiles access to Glance buttons.
- Add permission sets to users that you want to grant access.
Modify Profile Settings
-
From the Salesforce app, click the Glance Company Settings tab at the top.
-
Click Edit.
-
Scroll to the Profile Settings section.
-
If you want to modify an existing Profile configuration:
-
For Profile, choose which Profile you want to configure the Glance buttons for.
-
Under Show, View or Join, check which buttons you want to be available for Users with that Profile.
-
Under Join In, choose whether Users with that Profile will join sessions in a Browser Tab or in the Glance Client. Joining sessions in the Glance Client requires Users to have the client installed. If the User is working from Chrome or Firefox, they will also need the Glance browser extension. See Glance Buttons above for details on button functions.
-
Under Add Video choose the type of video experience you would like agents to have.
- No Video: Agents have no video experience
- Agent Video: Agents show 1-way Video
- Multi-Participant Video: Small: Multi-way video that starts in small video mode. Note this configuration is only supported for 1-Click Connect.
- Multi-Participant Video: Large: Multi-way video that starts in large video mode. Note this configuration is only supported for 1-Click Connect.
-
If you want to modify video profile configurations, choose either Video (SMS) or Video (APP). Video SMS allows you to send SMS text invitations to view the visitor's camera. Video (APP) allows you to start two-way video sessions. Note: your group must be provisioned with access to start mobile video sessions, and you cannot choose both video options. If you want access to these features, Contact Glance.
- Under Video (SMS), choose this option if you want to enable users to send visitors an SMS invitation to show the agent their camera. Then under Mobile Video choose a default camera for the visitor.
- Under Video (APP): choose this option if you want to enable users to start two-way video sessions. Then under Mobile Video choose a default camera for the visitor.
-
-
If you want to configure Glance for another Profile, at the top of the section click Add.
-
At the top of the page, click Save.
Add Permission Sets
Now modify your permission sets to enable Glance for your users.
- Click Setup (gear icon).
- In Quick Find, search for Permission Sets.
- Select Glance User.
- Click Manage Assignments.
- Select the users you want to add, and click Add Assignments.
If a User views the Glance Component and does not have Profile Settings configured for their Profile, or if buttons are not enabled for the Object, they will see an error message.

You can hide buttons for users without access to Glance, so they do not see this error.
Glance for Salesforce Users
This section shows a list of all the current users including their account and subscription details. If users authenticate with SSO, they will not appear in the list, unless they manually entered their Glance Address / Password.
To remove the association between a Salesforce account and the Glance account:
- From the Salesforce app, click the Glance Company Settings tab at the top.
- Click Edit.
- Scroll to the Glance for Salesforce Users section.
- Locate the user you want to modify.
- In the Action column, click Del.
- Click OK.

NOTE: Removing association does not delete the Salesforce user or cancel the Glance Screen Share account. It will only remove their Glance username and password from the Glance User Settings, which will prohibit the user from using Glance within Salesforce. To permanently remove a users access to Glance, contact your Glance Administrator or Glance Customer Success.