
Configuring Glance Company Settings in Salesforce
At the top of Glance Company Settings are the main settings for the package. It also includes some options to configure Single Sign-on and which Glance buttons you want to be available to your agents.
To get to Glance Company Settings:
- While in the Glance for Salesforce app, click on Glance Company Settings at the top.
- Or, from the App Launcher in Lightning, search for Glance and click on Glance Company Settings.
Default Glance Admin
Under the Settings category, the Default Glance Admin option defines which Salesforce user is an admin for your company's Glance account. This drop-down menu will list all users with these privileges. Selecting a name from the list will assign administrative rights. First-time users or trial users will be assigned to the default administrator's group of Glance users, even if they are not admins, so please double-check the defined admin is an admin for your Glance group.

NOTE: The list of admin users will only be visible if the admins have navigated to the Glance User Settings tab and have entered their Glance username and password.
Create Leads for Session Guests
If you have guests who join one of your Glance Screen Share sessions and provide contact information, new leads will be created for them if they do not currently exist in Salesforce. This is great if you want to use Glance to host webinars for marketing purposes. For more details on collecting user information, check out the Screen Share section. This does not apply for using Cobrowse.
NOTE: You can host a session from a Lead, Contact, Case, Opportunity, Campaign, or Person Account.
In the drop-down box choose one of the following options:
- Never: does not create any new Leads for session guests.
- Who Provide a New Email: creates a new Lead for any guest who provides an email address when joining. A new Lead will only be created if there is no existing Lead with that same email address.
- Who Provide a New Email and Name: creates a new Lead for any guest who provides both an email address and name.
Automatically Associate Sessions with Opportunities or Cases
When you use Glance from a Salesforce record, a session event is logged to that record. If you use Glance from a Contact or Lead, this setting will also associate those sessions with related Opportunities or Cases. If you select Let users choose, then each user can set this individually from the Glance User Settings object.
Create Salesforce Events for Non-Salesforce Sessions
Glance sessions can be started from either Salesforce or the desktop of a Glance client. When this option is checked, Glance for Salesforce will log all sessions (creating Salesforce Events) including those started by the Glance client.
Open Glance Session Events
When a session is launched, Glance automatically creates an Event record and saves it. By selecting Open Glance Session Events, the user is redirected away from the object from which they started the session by opening an Event record page. This can be helpful if you want to capture notes in Salesforce during your session.
Allow Free Trial?
Allow Free Trial? will allow users in your org to try Glance Screen Share for free from within the Glance for Salesforce application. Glance does not recommend enabling this feature.

NOTE: Glance does not offer a free trial for Cobrowse.
Free Trial Disabled Message
The Free Trial Disabled Message is the message shown to users if they try to sign up for a free trial after you have disabled it.
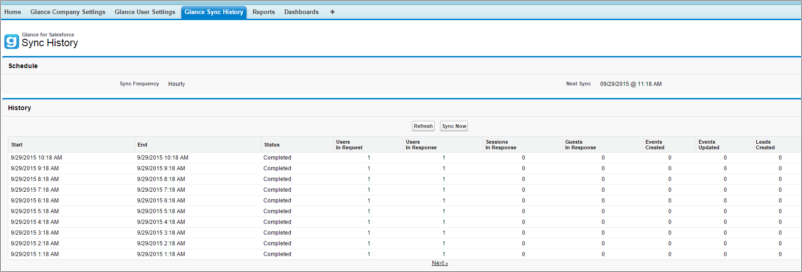
Sync Frequency
Glance for Salesforce automatically synchronizes all Glance session data with Salesforce Events. The Sync Frequency setting allows you to determine how often updates occur: Hourly, Every 2 hours, Daily, or Never.
Synchronization happens relative to the time you first installed the Glance for Salesforce package. So, if you install the package at 1:14 p.m. and you synchronize every hour, synchronizations will occur at 2:14 p.m., 3:14 p.m. etc.
As an option, synchronization jobs may be run manually from the Glance Sync History page, which is located on the Glance for Salesforce navigation bar. Simply select the tab, click the Sync Now button, and click Refresh. Next Sync displays the date and time of the next scheduled sync.
Chatter
The Glance for Salesforce Chatter setting automatically alerts Salesforce users whenever you start or join a Glance session with any prospect or customer they follow. The automatic notification includes a link to the session that Chatter users can click to join from any desktop, tablet, or mobile device.
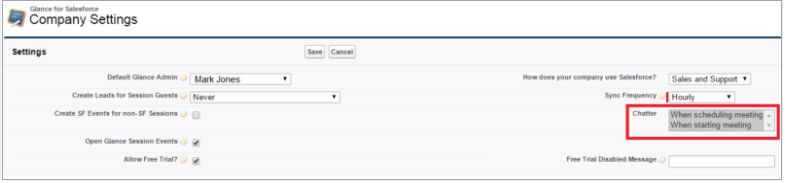
Glance for Salesforce provides the following two Chatter setting choices:
- When scheduling meeting: posts scheduled Glance meetings to the Chatter feed of anyone following the related object (Lead, Opportunity, etc.).
- When starting meeting: posts started Glance meetings to the Chatter feed of anyone following the related object.
NOTE: To deselect these options, you may need to click while holding the CTRL key on Windows or the CMD key on a Mac.
Single Sign-on (SSO)
At first, this option will be empty. See the section below on configuring SSO.
If you are not using SSO, every user must sign in with their Glance address and password from the Glance User Settings object. This can be found at the top of the Glance for Salesforce application next to Glance Company Settings.
If you are using Cobrowse without any client software, your agents will also need to keep a browser tab open and stay signed into their Glance account. We have a page for this that can be found at www.glance.net/account/accountkeepalive.aspx.
Session Types
The Session Types category of the Company Settings page includes three types of sessions:
- Show My Screen: starts a session to show your screen and invites guests to join.
- View Guest's Screen: starts a session to view someone else's screen and invites a guest to join. (Requires small download for guest.)
- Cobrowse: join a Cobrowse session started by a customer from your website. You may be required to enter a key which should be provided by the customer, or an agent can initiate a session if 1-Click Connect is enabled. Cobrowse allows agents to View or View and Control the visitor's browser window.
NOTE: For instructions on setting up Cobrowse on your website to join a session through CRM integration, please review the Cobrowse Getting Started section and the Cobrowse Customizing section.

Check the boxes to enable which buttons appear for all users. You have the option to control which objects the Cobrowse/Join button appears on. This will apply to all users who access any record that contains a Glance button.
If you have configured your website to use Cobrowse with Presence for 1-Click Connect, you also have the option to define which field is used for the Visitor ID on the Lead, Contact, and Case objects. For more information, see 1-Click Connect Requirements.
Live Agent
Glance offers a deep integration with Salesforce Live Agent. If you are interested in using it, go to the Glance for Salesforce Live Agent Extension section for more information. Otherwise, you can ignore the settings in this section.
Glance for Salesforce Users
If you are not using SSO, this section shows a list of all the current users including their account and subscription details.
Clicking Del under the Action column will delete the association between the Salesforce account and the Glance account. It will not delete the Salesforce user or cancel the Glance Screen Share account.