Using Glance with Salesforce Chat
Glance leverages Presence to enable 1-Click Connect during chat sessions using the Chat ID as the Glance Visitor ID. The following steps are to set this up.
NOTE: Glance with Chat is only available in Lightning Experience and using our 1-Click Connect . For Classic Console, you will need to use our legacy package with an extension package.
Configure Salesforce for Glance with Chat
NOTE: If you want to enable Glance's 1-Click Connect capability from chat in a Digital Experience, see this section.
First you need to set up a field for the Glance Visitor ID, and then configure the Glance Buttons to use it during Chat sessions.
Set up a Visitor ID formula field on Chat Transcript
Glance Presence only accepts alphanumeric strings as a Visitor ID, so the first step is to create a formula field that strips the hyphens from the Chat ID. This field will be used as the Visitor ID in Glance Buttons settings.
- From Setup, go to Object Manager.
- In Quick Find, type Chat Transcript, then click on Chat Transcript.
- On the left, click Fields and Relationships.
- At the top, click New.
- At Step 1, choose Formula and click Next.
- At Step 2, set Field Label to Glance Chat Visitor ID. Let Field Name auto-populate.
- Below, select Text, and then click Next.
- At Step 3, copy the following text and paste it into the formula editor:
SUBSTITUTE(ChatKey, '-', '') - Click Next.
- Click Save.
Add a Chat Transcript Lookup Field to the Glance Session Object
A Lookup field defines a relationship between a Glance Session record and a Chat Transcript record. This makes it possible to log Glance Sessions related to custom object records and appear in a Related List on that object.
- From Setup, go to Object Manager.
- In Quick Find, type Glance Session, then click on Glance Session.
- On the left, click Fields & Relationships.
- Click New.
- At Step 1, select Lookup Relationship and click Next.
- At Step 2, in the dropdown, choose Chat Transcript and click Next.
- At Step 3, under Field Label, set it to
Glance_Chat_Transcript. Let Field Name auto-populate. Then click Next. - At Step 4, set field-level security if you like, then click Next.
- At Step 5, click Next to add the field to the default Page Layout.
- At Step 6, click Save to create the field.
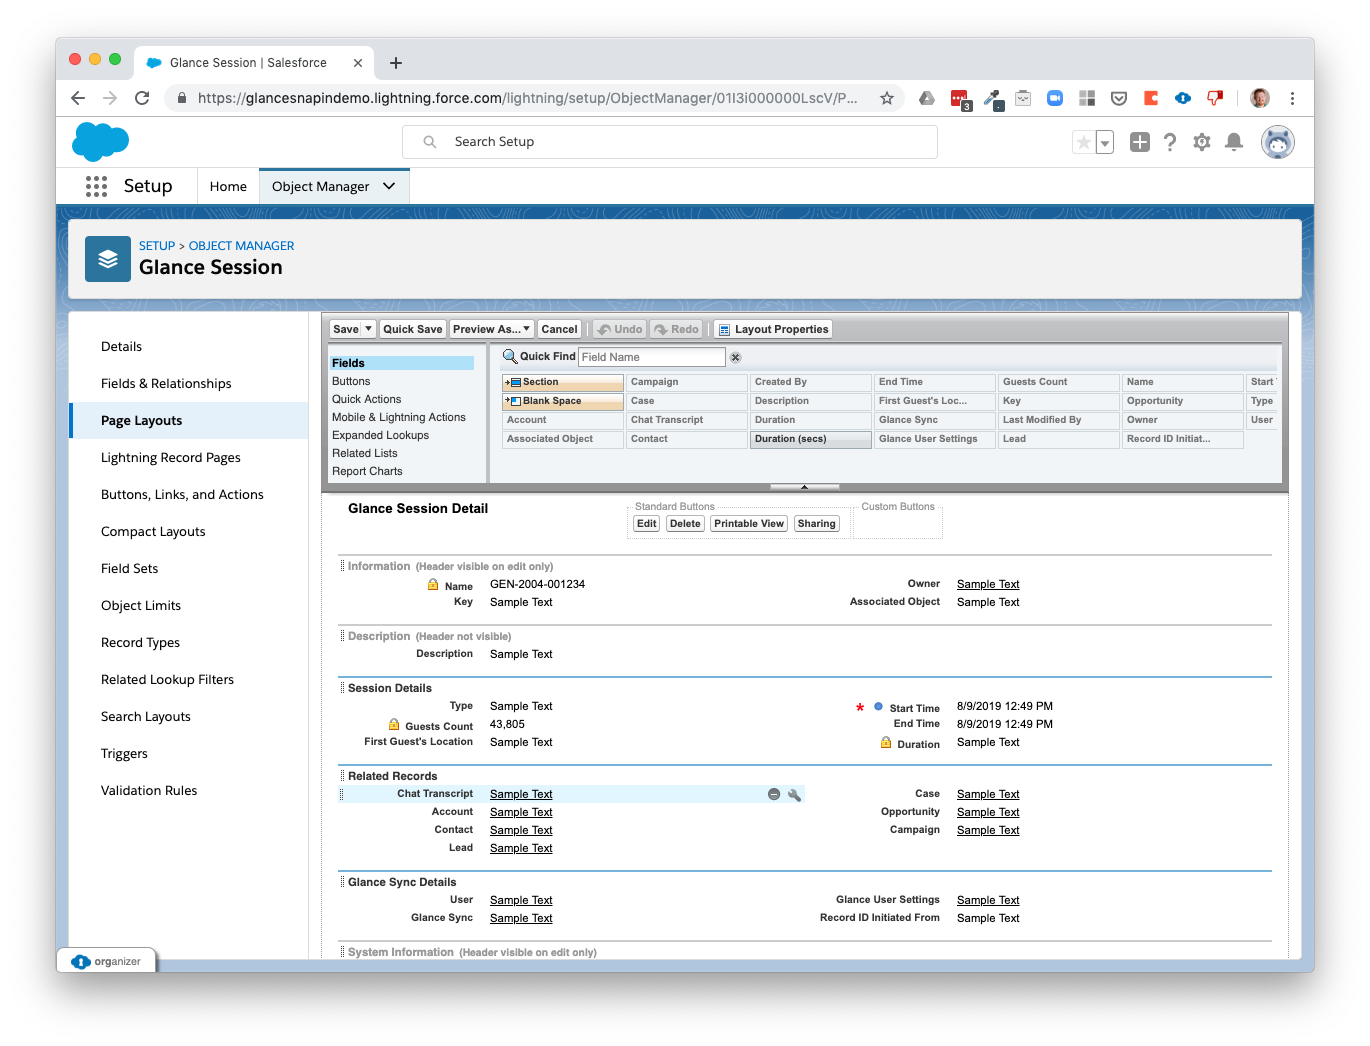
Move the new Chat Transcript field in the Glance Session Page Layout
This step makes it easier to find related Chat records from Glance Session records.
- On the left, click Page Layouts, and then Glance Session Layout.
- Move the newly-created Chat Transcript field from the Information section into the Related Records section.
- Click Save.

Configure the Glance Buttons for Chat Transcript
With the Lookup relationship in place, you can now configure the Glance Buttons.
- Return to Glance Company Settings from the App Launcher or from the Glance app.
- At the top, click Edit.
- In the Glance Buttons section, click Add.
- In the new row where it says –None–, click the dropdown and select Chat Transcript.
- In the row, disable Show and View, but make sure that Join is enabled.
- Under Visitor ID Object, select Chat Transcript.
- Under Visitor ID Field, select Glance Chat Visitor ID.
- Scroll back to the top and click Save.
- It should look something like this:

Add the Glance Buttons to Chat Transcript Lightning Record Page
After the relationship is defined and the buttons are configured, the last step is to actually add the buttons to the Lightning Record Page for your users to access.
- From Setup, go to the Object Manager.
- In Quick Find, type Chat Transcript, then click Chat Transcript.
- On the left, click Lightning Record Pages and choose the page your agents use during Chat Sessions.
- When the builder loads up, on the left sidebar, under Custom – Managed, click and drag Glance over onto the console wherever you want Glance to be placed. We recommend placing it somewhere easy to see without scrolling.
- Click Save
- If prompted, click Activate.
- You might be prompted to assign the record page.
- After you assign the record page, click Save.
- In the top right corner, click Back to return to Setup.
Configure your website for Glance with Chat
You also need to configure your website to use the Chat ID as the Glance Visitor ID. Glance can work with both Embedded Services Chat and Classic Chat, but the steps are different for each.
Verify the Glance Cobrowse Script Position
On your website, find this line in a code snippet:
src='https://service.force.com/embeddedservice/5.0/esw.min.js'></script>
Make sure the Glance Cobrowse script tag comes before this script tag on your web pages. In general, we encourage you to place the Glance Cobrowse script in the header of your web pages.
Here is an example:
<script
  id="glance-cobrowse"
  type="text/javascript"
  src="https://www.glancecdn.net/cobrowse/CobrowseJS.ashx?group=<<your group id here>>&site=production"
  data-groupid="<<your group id here>>"
  data-site="production"
  data-presence="on"
  charset="UTF-8"
></script>
Glance for Embedded Services Chat
To integrate Glance into your Lightning Console using Embedded Services Chat, follow these steps:
Prerequisites
- Embedded Services Chat in Salesforce is set up
- You added the Glance join button to the live chat transcript lightning record
- You verified the Glance Cobrowse script position
- Your site is externally facing and implemented with cobrowse
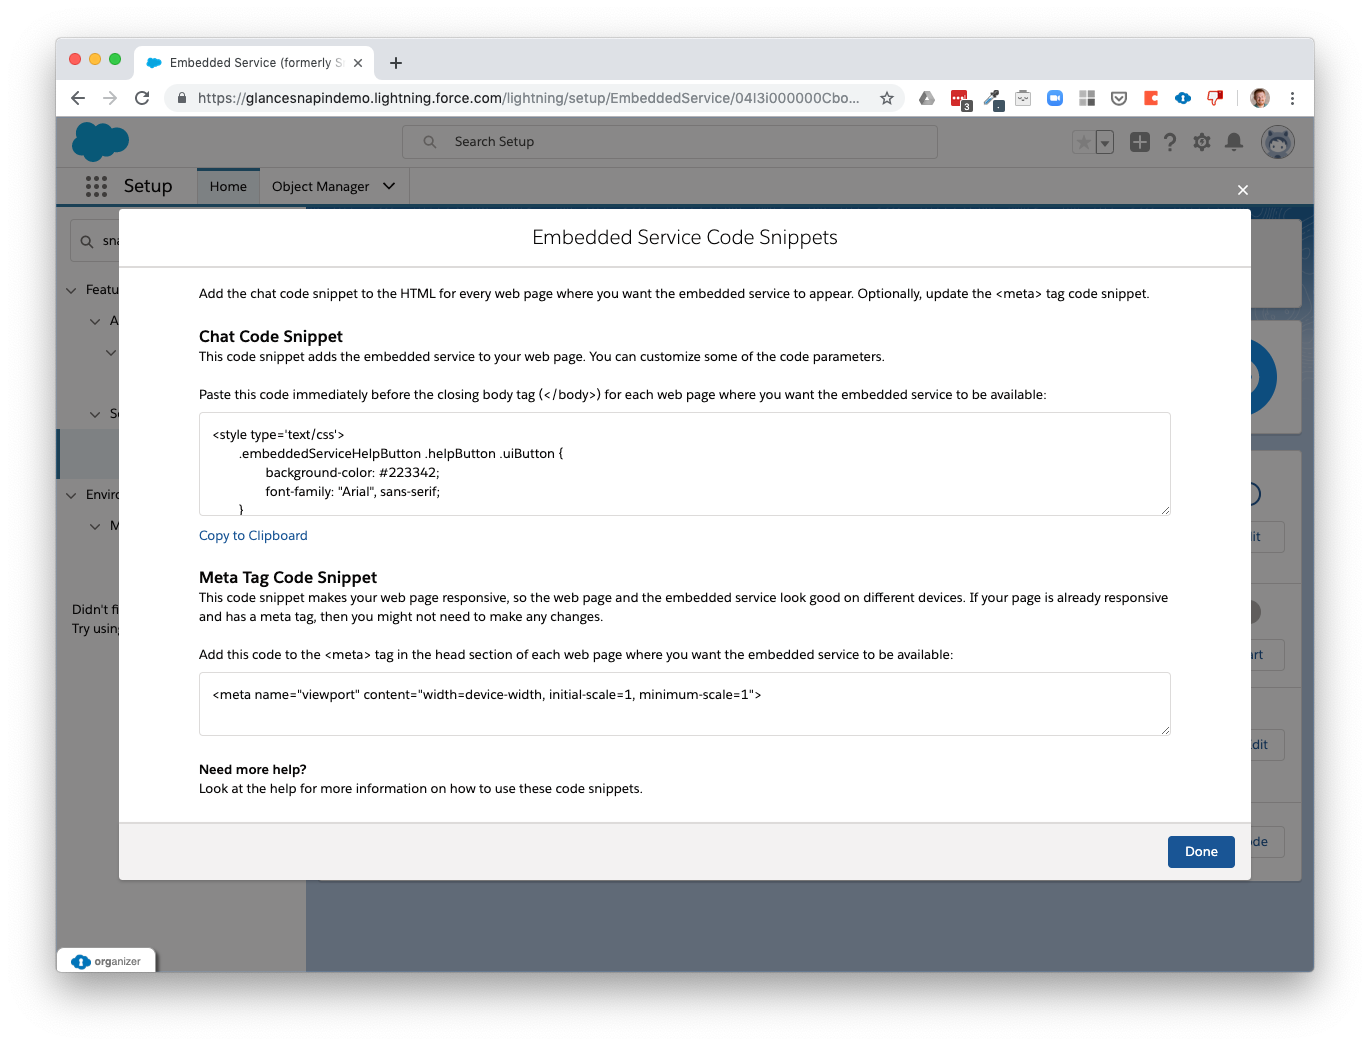
Retrieve Your Embedded Services Chat Script
If you need to get your Live Agent Embedded Services Chat script again, you can retrieve it with these steps:
- Under Setup, search for Embedded Service.
- In the row with your Embedded Service deployment, click the down arrow on the right and click View.
- In the box for Embedded Service Code Snippets, click Get Code on the right.

Add the Glance Chat Listener Script
In the Embedded Services Chat generated code, find this line:
embedded_svc.settings.entryFeature = 'LiveAgent';
Then, paste the following Glance Chat Listener Script after that line.
NOTE: You need to enter your group ID in two places, marked ‘<
var visitor;

function messageListener(e) {

  if (typeof e.data === 'string' && e.data.indexOf('startSession') == 0) {
    var key = e.data.split(':')[1];

    GLANCE.Cobrowse.Visitor.startSession(key);
  }

  if (e.data) {
    if (e.data.data) {
      // Chat started.
      if (e.data.data.event == 'chasitorChatEstablished') {
        if (e.data.data.chasitorData) {
          var visitorid = e.data.data.chasitorData.chatKey.replace(/-/g, '');

          console.log('Chat Start - visitorid=' + visitorid);

          visitor = new GLANCE.Presence.Visitor({
            groupid: << your group id here >> ,
            visitorid: visitorid
          });

          visitor.presence();
        }
      }

      // Chat restarted.
      else if (e.data.method == 'liveagent.restored') {
        if (e.data.data.chasitorSessionData) {
          var visitorid =
            e.data.data.chasitorSessionData.chatKey.replace(/-/g, '');

          console.log('Chat Restart - visitorid=' + visitorid);

          visitor = new GLANCE.Presence.Visitor({
            groupid: << your group id here >> ,
            visitorid: visitorid
          });

          visitor.presence();
        }
      }

      // Chat timed out.
      else if (e.data.data.event == 'chasitorIdleTimeout') {
        if (visitor) {
          visitor.disconnect();
          GLANCE.Cobrowse.Visitor.stopSession();
        }
      }

      // Chat ended.
      else if (e.data.data.event == 'chasitorAgentChatEnded' || e.data.data.event == 'chasitorChasitorChatEnded') {
        if (visitor) {
          console.log('Chat End');

          visitor.disconnect();
          GLANCE.Cobrowse.Visitor.stopSession();
        }
      }
    }
  }
}

if (window.addEventListener) {
  addEventListener('message', messageListener, false);
} else {
  attachEvent('onmessage', messageListener);
}
This will connect Glance to Live Agent Chat on your website.
Glance for Classic Chat
To integrate Glance into your Lightning Console using Classic Chat, follow these steps:
Prerequisites
- You added the Glance join button to the live chat transcript lightning record
- You verified the Glance Cobrowse script position
- Your site is externally facing and implemented with cobrowse
Create a classic custom chat page, and add the following code to it:
<script type="text/javascript">
	function messageListener(e) {
		console.log('message', e);

		if (e.data && typeof e.data === 'string') {
			if (e.data.indexOf('ChatEstablished') != -1) {
				console.log('ChatEstablished');

				var message = {
					type: 'ChatEstablished',
					chatKey: liveagent.chasitor.getChatKey()
				};

				window.opener.top.postMessage(message, '*');
			}

			else if (e.data.indexOf('ChatEnded') != -1) {
				console.log('ChatEnded');

				var message = {
					type: 'ChatEnded',
					chatKey: liveagent.chasitor.getChatKey()
				};

				window.opener.top.postMessage(message, '*');

				console.log('ChatEnded');
			}
		}
	}

	if (window.addEventListener) {
		addEventListener('message', messageListener, false);
	} else {
		attachEvent('onmessage', messageListener);
	}
</script>
This code intercepts Salesforce chat messages, and looks for ChatEstablished and ChatEnded messages. When those messages are received, the code uses a postMessage call to inform the page that launched the chat of those events.
Add the Glance presence script to the page that launches the chat.
Add the code below to listen for messages from the custom chat window, and to invoke presence (start / end).
var visitor;

function messageListener(e) {
	console.log('message', e);

	if (e.data) {
		// Chat Started
		if (e.data.type == 'ChatEstablished') {
			var visitorid = e.data.chatKey.replace(/-/g, '');

			console.log('Chat Start - visitorid=' + visitorid);

			visitor = new GLANCE.Presence.Visitor({
				groupid: <<your group id here>>,
				visitorid: visitorid
			});

			visitor.connect();
		}

		// Chat Ended
		else if (e.data.type == 'ChatEnded') {
			if (visitor) {
				console.log('Chat End');

				visitor.disconnect();
				GLANCE.Cobrowse.Visitor.stopSession();
			}
		}
	}
}

if (window.addEventListener) {
	addEventListener('message', messageListener, false);
} else {
	attachEvent('onmessage', messageListener);
}
Try it Out
Once you have completed the steps, complete a chat session on your website. Once the chat view loads in the agent console, the Join button should light up orange, and you should be able to connect to a Cobrowse session with one click.


