Quickstart
NOTE: The following information is for the 6.1 version of the SDK.
The Glance Android SDK will display the mobile application or device screen to a remote agent. Once the session starts showing, the SDK will track view changes, activity changes, and device rotation.
This document describes the more common use case of Visitor sessions. A Visitor session is started by a user of your app that is not an authenticated Glance user, though they may be an authenticated user of your app. The session is joined by a customer support or sales Agent that is an authenticated Glance user.
To integrate with the SDK, an application needs to take the following steps, each outlined in their own section:
- Get an agent account and Group ID from Glance
- Include the AAR
- Optimized Builds
- Initialize the Visitor Class
- Set an Event handler
- Start a Visitor session
- Confirm it's working
- End the session
- (Optional) Media Projection
- (Optional) Masking Views
- (Optional) One-Click Connect
Get an Agent Account and Group ID from Glance
Before you get started you'll need a Glance account. Contact Glance to set up a Group (organization account) and an individual Agent account. You will receive:
- A numeric Group ID
- An agent username, for example agnes.acme.glance.net (Glance usernames are in the form of DNS names)
- An agent password
In production usage, agents will typically authenticate with a single-sign-on, often via their CRM implementation (e.g. Salesforce).
Include the AAR
You can find the AAR in [our public GitLab repo here] (https://gitlab.com/glance-networks/glancesdkdemos-android/-/tree/master/libs).
To include the AAR in the app, put it in the app/libs folder.
Then modify the app/build.gradle file to include the following:
plugins {
    id: 'com.android.application'
}
repositories {
    flatDir {
        dirs 'libs'
    }
}
Ensure multiDexEnabled is set to true within the android > defaultConfig section.
android {
    defaultConfig {
        minSdkVersion 19

        ...

        // Enabling multidex support.
        multiDexEnabled true
    }
    ...
}
Add the following block within the android section (this may already exist):
compileOptions {
    sourceCompatibility JavaVersion.VERSION_1_8
    targetCompatibility JavaVersion.VERSION_1_8
}
Add the following within the dependencies block of the build.gradle file:
implementation fileTree(dir: 'libs', include: ['glanceSDK.aar'])
implementation 'androidx.multidex:multidex:2.0.1'
implementation "org.java-websocket:Java-WebSocket:1.5.1"
Finally, change this line in settings.gradle:
repositoriesMode.set(RepositoriesMode.FAIL_ON_PROJECT_REPOS)
to:
repositoriesMode.set(RepositoriesMode.PREFER_SETTINGS)
Then, sync gradle by going to Tools -> Android -> Sync Project with Gradle Files or clicking the icon. Until you do this, Android Studio won’t be able to autocomplete or import the appropriate classes.
NOTE: If you have **android:allowBackup="true"** set on your project's manifest, you'll need to add the following rule on your manifest's application level: **tools:replace="android:allowBackup"**, otherwise you'll get a build error.
Optimized Builds
The Glance AAR includes a binary build for each supported native architecture. The Glance library uses the Android NDK and requires native support for each platform.
The Glance AAR file includes the binaries for each architecture and is larger as a result. To create an optimized and much smaller APK that only includes the library binary for a single architecture you need to take advantage of APK splits.
Follow the APK splits documentation to create optimized APKs.
Initialize the Visitor Class
You must call Visitor.init once to initialize the visitor class for your group, within an initialization function in your code (init, onCreate, etc.). Initialize the framework with your Glance Group ID, which is required. The token, name, email, and phone fields are optional and are used to identify your user. This information will be stored in Glance session records and available on reports and via our APIs.
You can pass empty strings or any other values useful to you. The limits are, name: 62 characters, email: 26 characters, phone: 30 characters.
Visitor.init(activity, 1234, "", "Vera Visitor", "vera@example.com", "444-555-1234", "<VISITOR_ID or empty>")
Visitor.init(activity, 1234, "", "Vera Visitor", "vera@example.com", "444-555-1234", "<VISITOR_ID or empty>");
Events
Before starting a session you should register a VisitorListener listener to monitor session events:
class MyActivity : VisitorListener {

    override fun onCreate(savedInstanceState: Bundle?) {
        super.onCreate(savedInstanceState)
        Visitor.init(this, 1234, "", "Vera Visitor", "vera@example.com", "444-555-1234")
        Visitor.addListener(this)
    }

    override fun onDestroy() {
        super.onDestroy()

        Visitor.removeListener(this)
    }

    // this is called on the Glance Event thread
    override fun onGlanceVisitorEvent(event: Event) {
        if (event.code == EventCode.EventConnectedToSession) {
            // Show any UI to indicate the session has started
            // If not using a known session key, you can get the random key here
            // to display to the user to read to the agent
            final String sessionKey = event.GetValue("sessionkey");
        }
        else if (event.code == EventCode.EventSessionEnded) {
            // Show any UI to indicate the session has ended
        }
        else if (event.type == EventType.EventWarning ||
                event.type == EventType.EventError ||
                event.type == EventType.EventAssertFail) {
            // Best practice is to log code and message of all events of these types
        }
    }
}
public class MyActivity implements VisitorListener {

    @Override
    protected void onCreate(@Nullable final Bundle savedInstanceState) {
        super.onCreate(savedInstanceState);
        Visitor.init(this, 1234, "", "Vera Visitor", "vera@example.com", "444-555-1234", "");
        Visitor.addListener(this);
    }

    @Override
    protected void onDestroy() {
        super.onDestroy();

        Visitor.removeListener(this);
    }

    // this is called on the Glance Event thread
    public void onGlanceVisitorEvent(Event event) {
        if (event.getCode() == EventCode.EventConnectedToSession){
            // Show any UI to indicate the session has started
            // If not using a known session key, you can get the random key here
            // to display to the user to read to the agent
            final String sessionKey = event.GetValue("sessionkey");
        }
        else if (event.getCode() == EventCode.EventSessionEnded ){
            // Show any UI to indicate the session has ended
        }
        else if (event.getType() == EventType.EventWarning ||
                 event.getType() == EventType.EventError ||
                 event.getType() == EventType.EventAssertFail) {
            // Best practice is to log code and message of all events of these types
        }
    }
}
NOTE:
You must wait for EventVisitorInitialized before calling startSession.
Start a Visitor Session
There are two main options to consider when starting a session: session key and video mode.
A session can start with or without a specific session key. If you don't want to provide a session key, you'll need to use the "GLANCE_KEYTYPE_RANDOM" string instead, in order to generate a random one and have it returned in the properties of the GlanceEvent with code EventConnectedToSession. If you have a known value you wish to use for a session key, such as a customer id, you can pass it to startSession. The key may only contain characters from the Base64URL set, up to 63 characters maximum.
A session can start with multiple different video modes. The options are as follows:
- VideoOff: Video for both the agent and user will start OFF
- VideoSmallVisitor: Small widget, Video for user will start ON, agent video will start OFF
- VideoSmallMultiway: Small widget, Video for user and agent will start ON
- VideoLargeVisitor: Large widget, Video for user will start ON, agent video will start OFF
- VideoLargeMultiway: Large widget, Video for user and agent will start ON
To start a session with parameters, use the StartParams class to set them, and pass that into startSession. You can also change the terms URL by using the setTermsUrl method:
val startParams = StartParams()
startParams.setKey(SESSION_KEY) // required
startParams.setVideo(VIDEO_MODE) // optional - defaults to VideoOff
startParams.setTermsUrl("https://google.com") // optional
Visitor.startSession(startParams)
StartParams startParams = new StartParams();
startParams.setKey(SESSION_KEY); // required
startParams.setVideo(VIDEO_MODE); // optional - defaults to VideoOff
startParams.setTermsUrl("https://google.com"); // optional
Visitor.startSession(startParams);
To start a session with a random key call, you must use the "GLANCE_KEYTYPE_RANDOM" string as a key:
startParams.setKey("GLANCE_KEYTYPE_RANDOM")
startParams.setKey("GLANCE_KEYTYPE_RANDOM");
Confirm it's Working
To confirm the integration is working, start the session and note the session key.
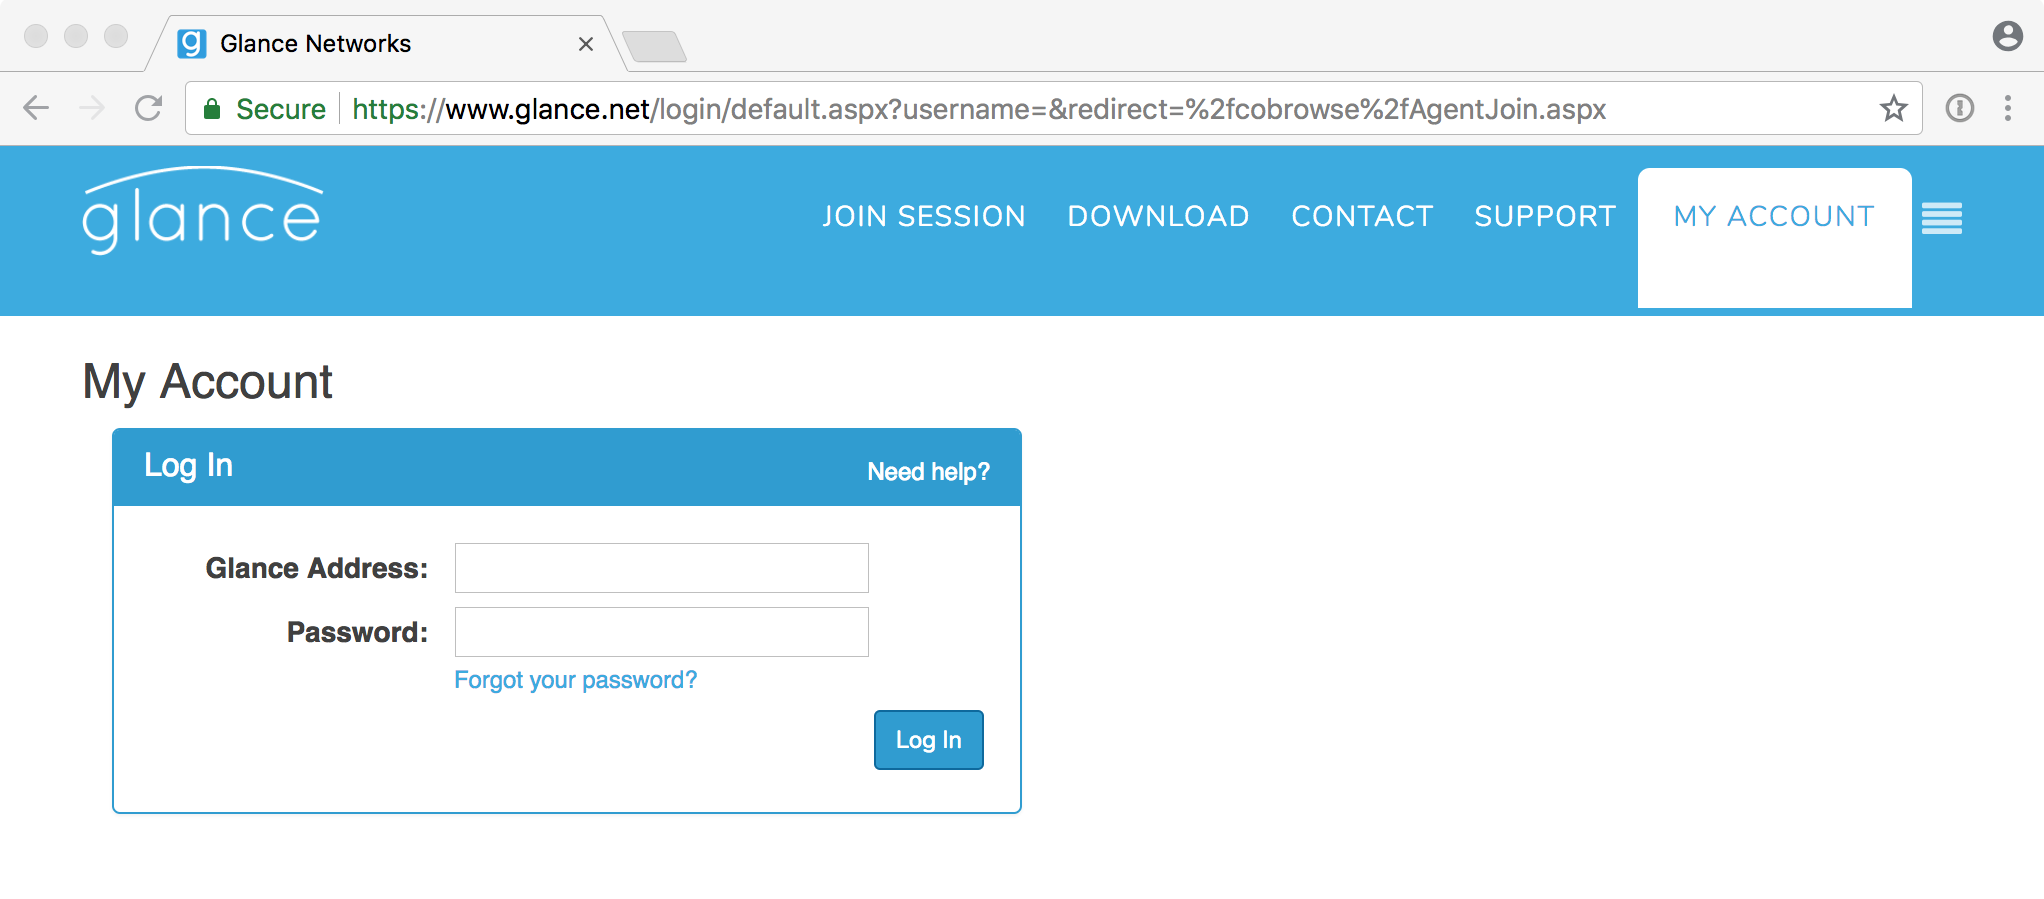
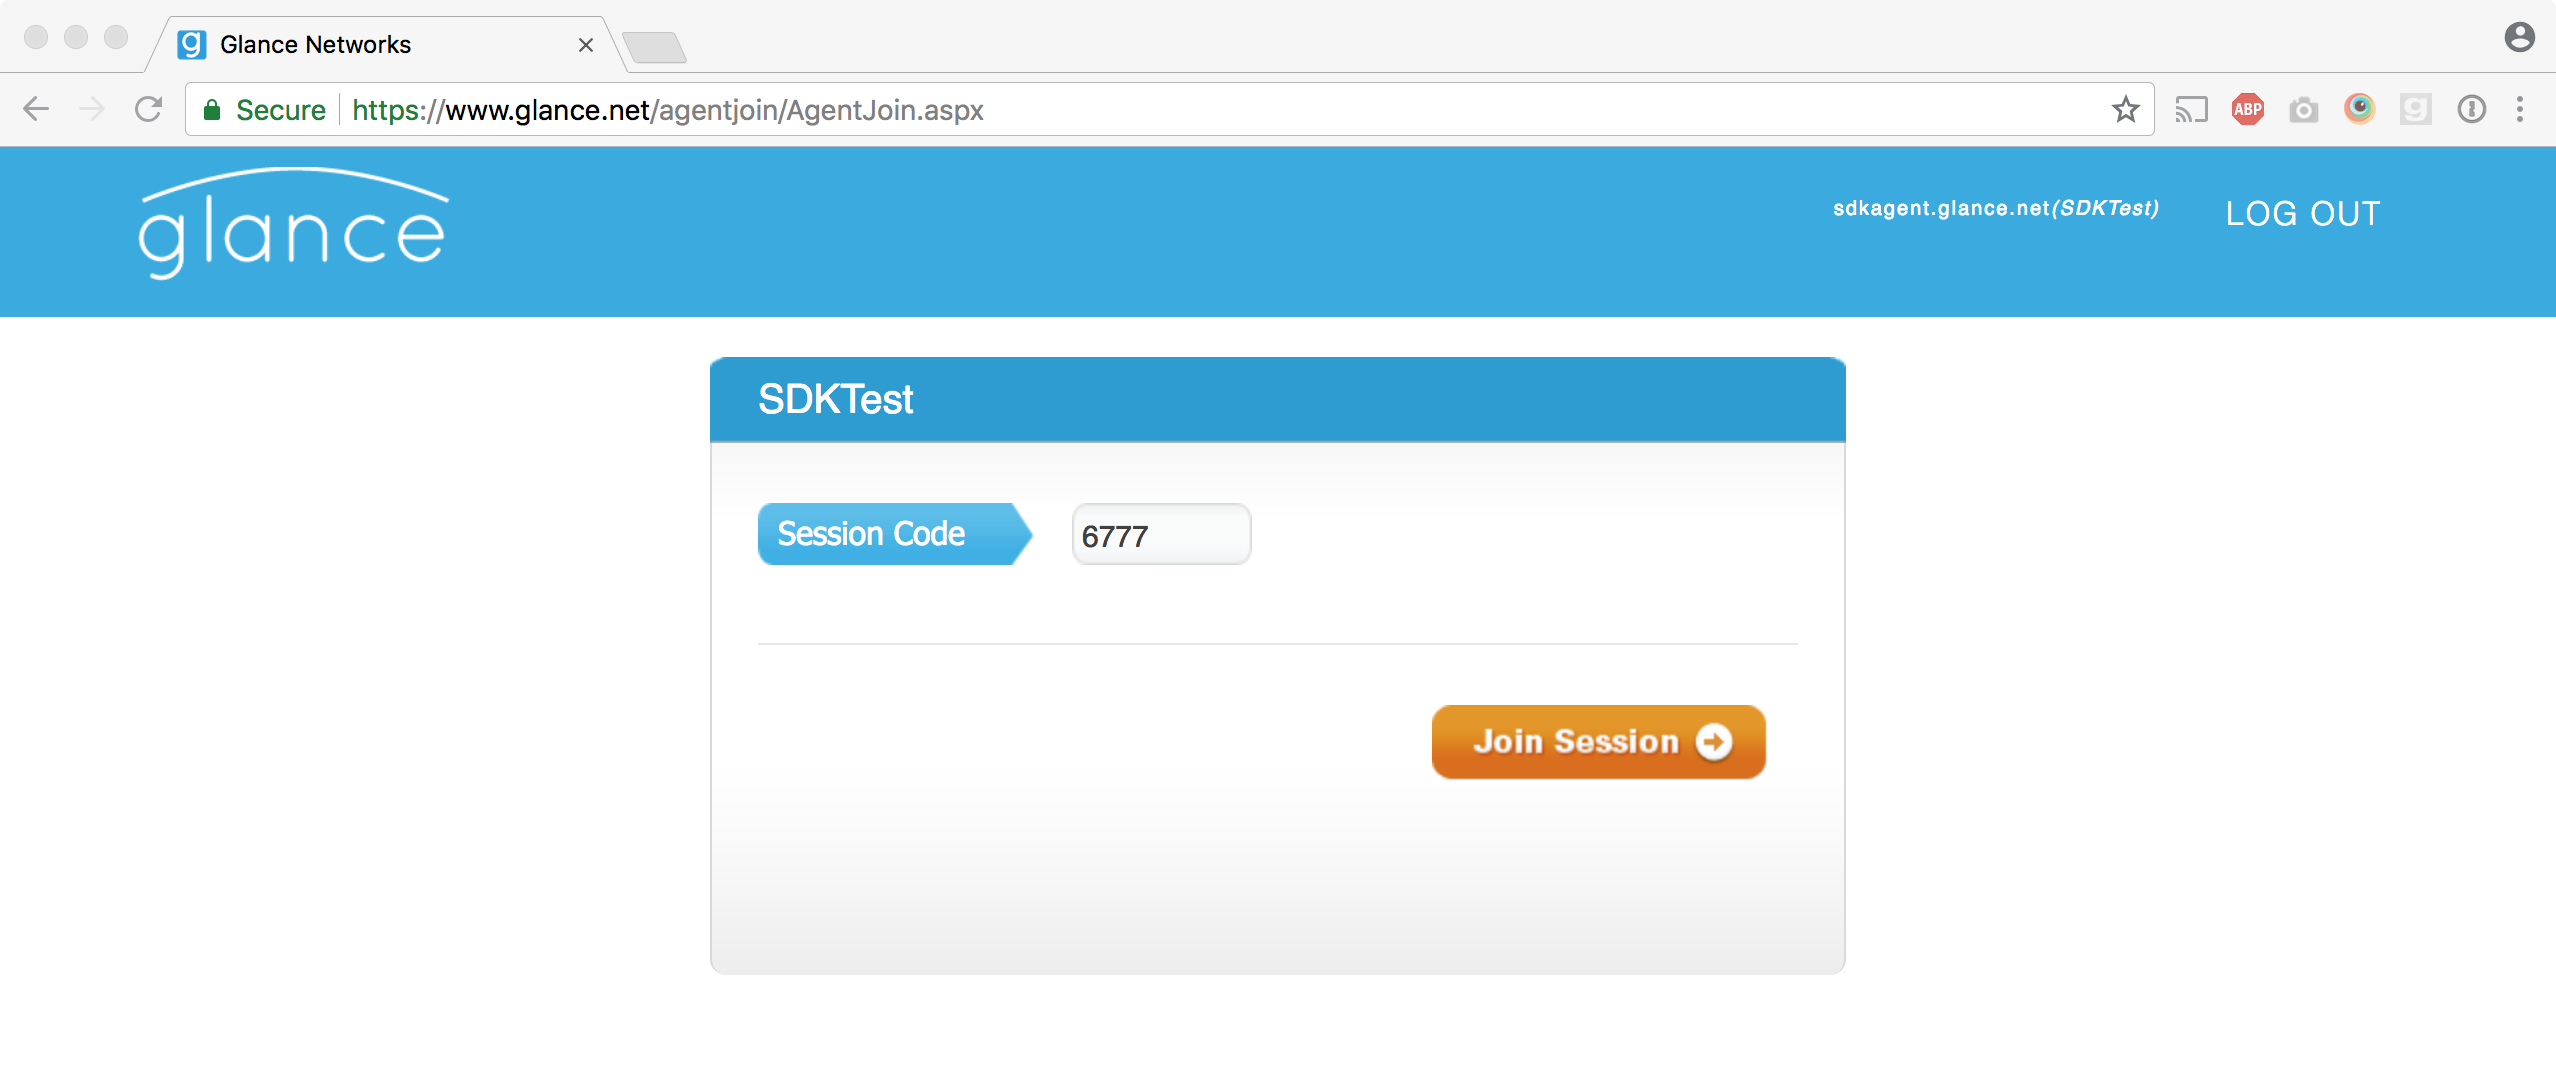
The agent should then go to: https://www.glance.net/agentjoin/AgentJoin.aspx.
If not logged in already, the agent will be asked to login:

When logged-in a form will be shown to enter the session key.

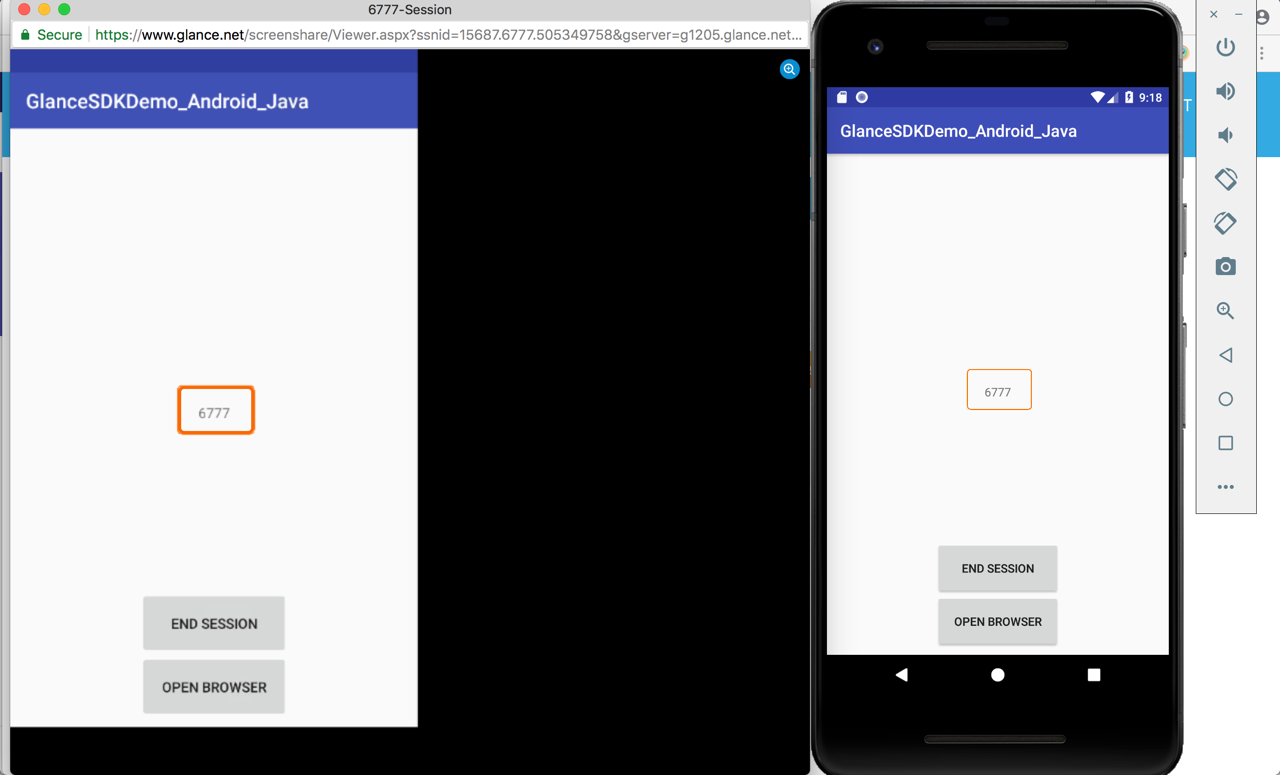
At that point the web viewer will display the screen being shared with the ability to gesture:

When the key is known a view can be opened directly with https://www.glance.net/agentjoin/AgentView.aspx?username={username}&sesionkey={key}&wait=1
End the Session
The session can be ended from either the agent side or the app side. To end from the app, call:
Visitor.endSession()
Visitor.endSession();
In either case the event EventSessionEnded will be sent.
Make sure to also remove the listener before the activity is destroyed (typically done in onDestroy):
Visitor.removeListener(this)
Visitor.removeListener(this);
Media Projection
Media Projection allows the recording of the entire screen, including the home screen and other applications. Full details can be found in the Media Projection Demo (Kotlin).
Permissions to Capture Entire Screen
If Media Projection is enabled, the SDK will request full screen capture permission at runtime on devices running Android Lollipop or later. If the user accepts, the session will utilize the permission to record the full screen. If the user rejects the SDK falls back to the solution that is used by pre-Lollipop Android devices to record the screen.
Masking and Gesturing Outside of the Application
Capturing the full screen on Android allows the SDK to record the home screen and other apps. When the user is outside the context of the app the SDK cannot mask views or display gestures to the user. This means that keyboards and input fields outside of the app integrating the SDK will be fully visible to the agent which may present security issues. Consider your app use case carefully before enabling the full screen feature.
Masking the Keyboard
Keyboard masking allows the SDK to cover the keyboard when its in use. This prevents potentially sensitive user information from being communicated to the agent. This feature only applies when permission to capture the entire screen is enabled and approved by the user. Otherwise keyboard masking is not necessary because the keyboard is not captured as part of the screenshare.
As a result of keyboard masking being specific to full screen mode it should be noted that keyboards displayed outside of the app integrating the SDK (other apps on the device and home screen) will not be masked.
To enable keyboard masking:
Visitor.maskKeyboard(true)
Visitor.maskKeyboard(true);
Masking Views
Specific views can be hidden from the agent by passing it them to the SDK. There are two ways to mask views: by view id or by passing in the view object. Masking by ID is the preferred approach that can work reliably within the Android activity lifecycle where activity instances are rapidly created and destroyed for a variety of reasons.
By View ID
Adding:
Visitor.addMaskedViewId(R.id.password_view)
Visitor.addMaskedViewId(R.id.password_view);
Removing:
Visitor.removeMaskedViewId(R.id.password_view)
Visitor.removeMaskedViewId(R.id.password_view);
By View Object
Adding:
var passwordView = findViewById<View>(R.id.password_view)
Visitor.addMaskedView(passwordView)
View passwordView = findViewById(R.id.password_view);
Visitor.addMaskedView(passwordView);
Removing:
var passwordView = findViewById<View>(R.id.password_view)
Visitor.removeMaskedView(passwordView)
View passwordView = findViewById(R.id.password_view);
Visitor.removeMaskedView(passwordView);
Masking a Composable view
To add ids to composable views, follow the instructions described in the official docs. In short, you'll need to:
- Create an
ids.xmlfile inres/values/and define your views ids there:
<?xml version="1.0" encoding="utf-8"?>
<resources>
    <item name="compose_view_1" type="id" />
</resources>
- Change your compose view to a native view form:
before
Text(
    text = stringResource(id = R.string.quick_demos_title),
    color = HomePrimaryTextColor,
    fontSize = 20.sp,
    fontWeight = FontWeight.Bold
)
after
// COMPOSE VIEW WITH ID REFERENCE SO WE CAN USE IT TO PASS TO THE SDK
AndroidView(factory = {
    TextView(it).apply {
        id = R.id.compose_view_1 // the id you defined in ids.xml
        text = it.getText(R.string.quick_demos_title)
        setTextColor(android.graphics.Color.WHITE)
        typeface = Typeface.DEFAULT_BOLD
        textSize = 20.sp.value
    }
})
- Proceed with the steps described in the By View ID section, using the same defined id.
One-Click Connect
Agent One-Click Connect can be implemented with the Presence and Signalling API.
Support
Email mobilesupport@glance.net with any questions.


