
Setup Guide
What's New?
The Demo Kit has been updated to work with Glance's newly renovated managed package with the namespace 'Glance'. It is easier to set up, and it allows you to configure Glance buttons for any object, including custom objects, thanks to a new flexible data structure for your session records and a drag-and-drop Lightning Component. Orgs you have already set up will continue to work the way they always have.
Three steps:
- Add the Glance packages to your Lightning demo org
- Complete the one-time setup
- Try it out!
Quick Links:
Install the Glance Package
You will need to add Glance’s main package and then an extension package specifically for demos.
- In a fresh Salesforce Org, install the Glance package.
- Click Install for Admins Only, and then click Install.
- Check Yes, grant access to these third-party web sites and then Continue. In an SDO, it takes about 8 minutes to install.
- You must install the main package before you install the Demo extension package.
Check Clickjack Settings
Salesforce has a feature to protect against clickjack, a malicious technique of tricking a user into clicking on a different from what the user perceives, potentially revealing confidential information or allowing others to take control of their computer while clicking on seemingly innocuous objects, including web pages.
If you have enabled some clickjack settings, you need to whitelist your Salesforce org domain to start Glance sessions.
-
Go to Setup (gear icon).
-
In the search, enter Session Settings.
-
Go to the Clickjack Protection section.
-
Check to see if "Enable clickjack settings for visual force pages" is selected.

NOTE: Do not select the setting if it is unselected.
-
If the above is selected, add the url for the salesforce org to the whitelisted domain section below, and click Add Domain.
-
Click Save.
Install the Glance Demo extension package
The extension package allows you to automatically authenticate into Glance. Before installing the Glance Demo Extension package for Salesforce, you must have completed the install of the Glance package in Salesforce (see the above section).
- Install the extension package.
- Same as before, install it for Admins Only.
- After the install, click Done.

NOTE: You’ll probably see a warning about this being a Non-Salesforce Application. This package has not been through security review because it’s not for actual customers. Don’t worry, we’re not interested in doing anything nefarious with the fake data in your demo org.
It should install within less than a minute.
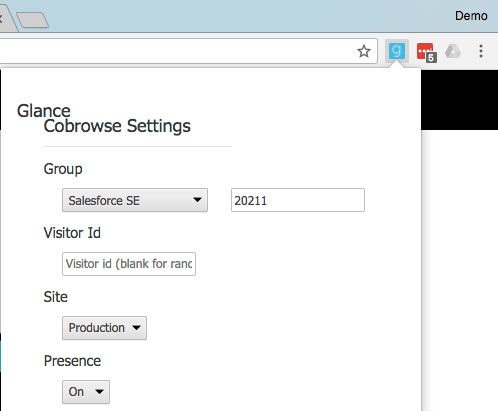
Add the Glance Cobrowse Injector extension to Chrome
This extension lets you demo Glance Cobrowse on most customer websites.
NOTE: If you are setting up Glance in Lightning Communities, skip to Installing the Glance Demo Extension Package
Typically, the customer’s web developer needs to add one line of Glance JavaScript to each page of their website, which makes content on the web page cobrowse-able. This Chrome extension injects that same line of JavaScript into each web page your browser shows.
Please note that this extension is only for doing demos. Your customer would never use it.
If you have done this before, you don’t need to do it again.
- Get the Injector here and install it.
- From the Chrome menu bar, click the G icon to open the extension options.
- Under Group, verify that it shows 20211.
- Verify that Presence is set to On.

Depending on the structure of the website, some elements of the page may not render correctly in the agent-side view, such as custom fonts, icons, hover events or some images. This isn’t because Cobrowse is broken—the service just hasn’t been “tuned” for the target website. Every website is different. In a full implementation, Glance offers professional services to tune cobrowse specifically for each client’s website.
If you prefer to use your own Injector extension like TamperMonkey or PersonalizedWeb, you can use this tag:
<script id="glance-cobrowse" src="https://www.glancecdn.net/cobrowse/CobrowseJS.ashx?group=20211&site=production" data-groupid="20211" data-site="production" charset="UTF-8" data-ws="www.glance.net" data-cookiedomain="" data-presence="on" data-ui="" data-inputevents="{"ctrl-13":"showButton","shift-13":"startSession"}"></script>
Run Demo Setup
After the extension package is installed, there is a step to automatically provision you with a Glance account in this org, sign you in with SSO, and configure some default settings for your demo.
- From anywhere in Lightning, click on the App Launcher.
- Enter Glance in the search field.
- Click Glance Demo in bottom.
- Agree to the terms (Please don’t resell, don’t steal, don’t attack us etc.)
- Click Setup.
You should see a result that says something like This org is now set up for demos. You’ve been provisioned with an account, SSO’d in, and configured demo-specific settings for you. You’re welcome!
Demoing Glance From a Different User
If you will be performing the demo as another user or your colleague will be performing the demo, each login will need to repeat the step above.
If the user's Profile is not a System Admin, Solution Manager, or Standard User Profile, you also need to complete this step:
- From anywhere in Lightning, click on the App Launcher.
- Enter Glance in the search field.
- Click Glance Company Settings.
- At the top, click Edit.
- Scroll down to Profile Access Settings and click Add
- In the added row, choose your other user's profile, and configure the row to match the other three.
- Scroll back to the top and click Save.
If the other user is not a System Admin, you will also need to assign them the Glance User permission set:
- From Setup, go to Permission Sets.
- Click Glance User.
- At the top, click Manage Assignments.
- Click Add Assignments.
- Check the box next to Users you would like to enable for Glance and click Assign.
Add the Glance Lightning Component to the Contact page in Lightning
To join the cobrowse session, you will need to add the Glance button to the Contact or Case.
- From the App Launcher, go to Lightning Service Console.
- Open up a contact record.
- Click the Gear in the top right corner, and then click Edit Page.
- In the left sidebar under Standard, click and drag the Glance custom component to the right column at the top.
- Click Save.
- If prompted, click Activate.
- Click Assign as Org Default.
- Click Save.
- Repeat for Case object if necessary.

Demo Glance Cobrowse
All set to demo Glance!
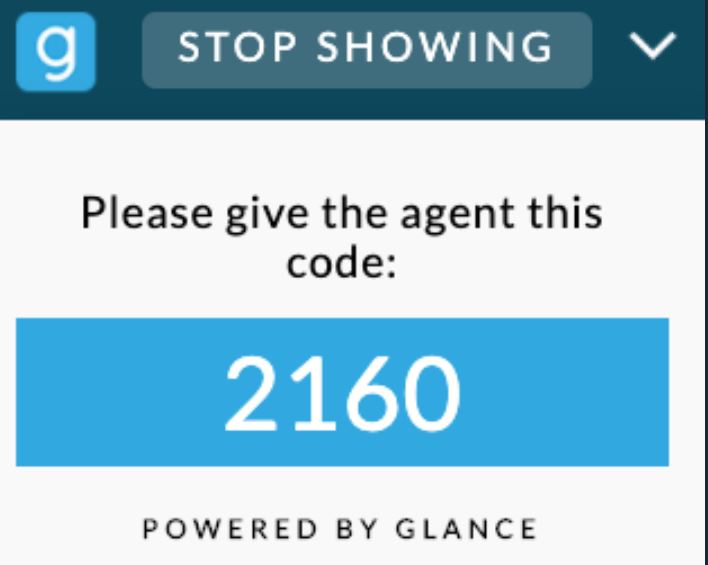
- In Chrome, representing the customer-side, go to a web page.
- From the customer-side web page, press Shift+Enter on your keyboard. In the bottom right corner of the page, you will receive the session code.

- From the Agent side, navigate to the Case or Contact record, and click Join.
- Enter the key and click Connect.
- Click the pop-up icon in Chrome’s address bar.
- Click “Always allow popups from
https://glancedemo" and then click the link above it (only required to do once).


A new tab opens with the cobrowse view.

NOTE: You have to use a hotkey when you use the Cobrowse Injector, but on production we strongly recommend that our customers add a link or button to the footer of their website that starts Cobrowse sessions. You’d be surprised how many consumers have trouble hitting a hotkey.
Troubleshooting
If you were unable to join a Cobrowse session:
- Make sure your user is a Sys Admin, or has the Glance User or Glance Admin permission set.
- Make sure you pushed the Setup button in the Glance Demo object
- Make sure the web page you want to cobrowse is tagged (you can inspect the page and look for a tag in the header)
- Try refreshing each page
- Make sure you allowed pop ups from your org’s domain
Other Problems
- SSO Partner User ID not set: You are not provisioned. Add the Demo Extension Package and Run Demo Setup. If you are using Cobrowse as a separate User (like Tim Service), you will need to run the setup again while logged in as that User. Anything else? Reach out to Glance Support.
Got a hot lead with questions? Contact sales@glance.net and we’ll be happy to jump in!