
Building your own UI
Build Your Own Interface
Glance provides the ability to create your own layouts so your app doesn't need to have different UI when using our SDK.
You can customize the default interface colors, text, and graphics to match your company’s branding, see Default User Interface for more information.
To build your own custom user interface the default UI needs to be disabled:
Visitor.defaultUI(false);

NOTE: by using this method, you'll be disabling all default UIs (and until you provide custom ones, they won't be shown for the user), so pay attention to it.
Custom Agent Viewer
A custom agent viewer can show the agent video in a custom view that your application controls.
The custom agent viewer requires a view that is present in all of the activity layouts with a consistent view ID.
The view type must be a subclass of net.glance.android.SessionView. The custom agent viewer can be customized through the subclassing of net.glance.android.SessionView to present the agent in a circle shape or other specific design.
An example custom agent viewer class that presents the agent within a circle:
public class RoundedAgentViewer extends net.glance.android.SessionView {

    private final String CORNER_RADIUS_ATTRIBUTE = "corner_radius";

    private float mRadius;

    private Path mPath = new Path();

    private RectF mRect = new RectF();

    public RoundedAgentViewer(Context context) {
        super(context);
    }

    public RoundedAgentViewer(Context context, AttributeSet attrs) {
        super(context, attrs);
        this.mRadius = attrs.getAttributeFloatValue(null, CORNER_RADIUS_ATTRIBUTE, 0f);
    }

    public RoundedAgentViewer(Context context, AttributeSet attrs, int defStyle) {
        super(context, attrs, defStyle);
        this.mRadius = attrs.getAttributeFloatValue(null, CORNER_RADIUS_ATTRIBUTE, 0f);
    }

    @Override
    protected void onDraw(Canvas canvas) {
        int savedState = canvas.save();
        float w = getWidth();
        float h = getHeight();

        mPath.reset();
        mRect.set(0, 0, w, h);
        mPath.addRoundRect(mRect, mRadius, mRadius, CCW);
        mPath.close();

        super.onDraw(canvas);
        canvas.restoreToCount(savedState);
    }

    @Override
    protected void onSizeChanged(int w, int h, int oldw, int oldh) {
        super.onSizeChanged(w, h, oldw, oldh);

        // compute the mPath
        float centerX = w / 2f; // calculating half width
        float centerY = h / 2f; // calculating half height
        this.mRadius = centerX;

        mPath.reset();
        mPath.addCircle(centerX, centerY, Math.min(centerX, centerY), Path.Direction.CW);
        mPath.close();
    }

    @Override
    protected void dispatchDraw(Canvas canvas) {
        int save = canvas.save();
        canvas.clipPath(mPath);
        super.dispatchDraw(canvas);
        canvas.restoreToCount(save);
    }
}
Define the view layout and ensure it is present in every activity layout.
Here's the custom agent viewer with id rounded_agent_viewer layout using the RoundedAgentViewer defined above:
<?xml version="1.0" encoding="utf-8"?>
<RelativeLayout xmlns:android="http://schemas.android.com/apk/res/android"
    xmlns:app="http://schemas.android.com/apk/res-auto"
    xmlns:tools="http://schemas.android.com/tools"
    android:id="@+id/custom_glance_agent_viewer_parent"
    android:layout_width="wrap_content"
    android:layout_height="wrap_content"
    android:visibility="gone"
    android:elevation="2dp">

    <net.glance.defaultuidemo_java.views.RoundedAgentViewer
        android:id="@+id/custom_glance_agent_viewer"
        android:layout_width="120dp"
        android:layout_height="120dp"
        android:layout_marginStart="10dp"
        app:layout_constraintBottom_toBottomOf="parent"
        app:layout_constraintLeft_toLeftOf="parent"
        tools:layout_editor_absoluteX="0dp"
        tools:layout_editor_absoluteY="0dp"/>

    <!--  THIS IS OPTIONAL SO YOU CAN DOUBLE CONFIRM WITH THE USERS WHETHER THEY REALLY WANT TO END THE SESSION  -->
    <!--  ALSO, SHOULD BE PLACED HERE SO YOU CAN MOVE THIS VIEW TOGETHER WITH THE AGENT VIDEO, JUST LIKE THE GLANCE'S DEFAULT ONE  -->
    <ImageButton
        android:id="@+id/bt_stop_agent_video"
        android:layout_width="40dp"
        android:layout_height="40dp"
        android:layout_below="@+id/rounded_glance_agent_viewer"
        android:layout_alignStart="@+id/rounded_glance_agent_viewer"
        android:layout_alignEnd="@+id/rounded_glance_agent_viewer"
        android:background="@android:color/transparent"
        android:src="@drawable/ic_glance_exit" />

</RelativeLayout>
The custom agent viewer layout defined above now needs to be included within each layout. It is recommended to define the layout in its own file like the one above, called rounded_agent_viewer.xml, and include it within every activity layout:
<?xml version="1.0" encoding="utf-8"?>
<androidx.constraintlayout.widget.ConstraintLayout xmlns:android="http://schemas.android.com/apk/res/android"
    xmlns:app="http://schemas.android.com/apk/res-auto"
    xmlns:tools="http://schemas.android.com/tools"
    android:layout_width="match_parent"
    android:layout_height="match_parent"
    tools:context=".MyActivity">

    ...

    <include layout="@layout/rounded_agent_viewer" />

</androidx.constraintlayout.widget.ConstraintLayout>
Pass the view ID custom_glance_agent_viewer to enable the customer agent viewer within the Visitor API:
Visitor.setCustomSessionViewId(R.id.custom_glance_agent_viewer);
To remove the custom agent viewer behavior:
Visitor.clearCustomSessionViewId();
NOTE: since it is an entire custom view, you need to provide the drag gesture implementation yourself. So check this demo's implementation as an example:
private void showAgentVideo(int visibility) {
    rlCustomGlanceAgentViewerParent.setVisibility(visibility);

    boolean isVisible = visibility == View.VISIBLE;
    rlCustomGlanceAgentViewerParent.setClickable(isVisible);
    rlCustomGlanceAgentViewerParent.setFocusable(isVisible);

    if (isVisible) {
        // setting the touch listener for the entire view, so you can include the end session button and other views as part of it as well
        rlCustomGlanceAgentViewerParent.setOnTouchListener((view, motionEvent) -> {
            switch (motionEvent.getActionMasked()) {
                case MotionEvent.ACTION_DOWN:
                    dXCustomAgentViewer = view.getX() - motionEvent.getRawX();
                    dYCustomAgentViewer = view.getY() - motionEvent.getRawY();
                    break;
                case MotionEvent.ACTION_MOVE:
                    view.setY(motionEvent.getRawY() + dYCustomAgentViewer);
                    view.setX(motionEvent.getRawX() + dXCustomAgentViewer);
                    break;
                default:
                    return false;
            }
            return true;
        });
    } else {
        rlCustomGlanceAgentViewerParent.setOnTouchListener(null);
    }
}
VisitorListener
When customizing the UI, you will need to handle almost all views' states inside the VisitorListener events changes
private VisitorListener defaultVisitorListener = new VisitorListener() {
        @Override
        public void onGlanceVisitorEvent(Event event) {
            if(event.getCode() == EventCode.EventConnectedToSession) {
                // Show any UI to indicate the session has started
                // If not using a known session key, you can get the random key here
                // to display to the user to read to the agent
                final String sessionKey = event.GetValue("sessionkey");

                runOnUiThread(() -> {
                    swDefaultUi.setEnabled(false);
                    tvSessionKey.setText(getString(R.string.session_key,sessionKey));
                    btStartSession.setEnabled(false);
                    btEndSession.setVisibility(View.VISIBLE);
                    pbLoading.setVisibility(View.GONE);
                });

            } else if(event.getCode() == EventCode.EventGuestCountChange) {
                runOnUiThread(() -> flSSIndicationBorder.setVisibility(View.VISIBLE));
            } else if(event.getCode() == EventCode.EventChildSessionStarted) {
                // The agent started a video session

                runOnUiThread(() -> {
                    // remember to change the view class type in case you change the view too
                    SquaredAgentViewer agentViewer=findViewById(R.id.custom_glance_agent_viewer);
                    AppCompatImageView agentImageView=(AppCompatImageView)agentViewer.getChildAt(0);
                    agentImageView.setId(View.generateViewId());

                    agentImageView.postDelayed(() -> {
                        showAgentVideo(View.VISIBLE);
                    }, 2500); // just to make sure that the button won't appear before the video
                });
            } else if(event.getCode() == EventCode.EventChildSessionEnded) {
                runOnUiThread(() -> showAgentVideo(View.GONE));
            }
        }
}
DefaultUI.DefaultUIListener
In order to show proper views relying on the event, you'll also need to implement the DefaultUI.DefaultUIListener. Please check the demo implementation below:
private DefaultUI.DefaultUIListener defaultUIListener = new DefaultUI.DefaultUIListener() {
        @Override
        public void defaultUIVoiceDidAuthenticate(String s) {
            Log.i(GLANCE_TAG, "defaultUIVoiceDidAuthenticate");
        }

        @Override
        public void defaultUIDidHangUp() {
            Log.i(GLANCE_TAG, "defaultUIDidHangUp");
        }

        @Override
        public void defaultUIDidMute() {
            Log.i(GLANCE_TAG, "defaultUIDidMute");
        }

        @Override
        public void defaultUIDidUnmute() {
            Log.i(GLANCE_TAG, "defaultUIDidUnmute");
        }

        @Override
        public void defaultUIDidTurnSpeakerphoneOn() {
            Log.i(GLANCE_TAG, "defaultUIDidTurnSpeakerphoneOn");
        }

        @Override
        public void defaultUIDidTurnSpeakerphoneOff() {
            Log.i(GLANCE_TAG, "defaultUIDidTurnSpeakerphoneOff");
        }

        @Override
        public void defaultUIDidClose() {
            // The user clicked on the Cancel button on the Session Key circled dialog
            pbLoading.setVisibility(View.GONE);
            Log.i(GLANCE_TAG, "defaultUIDidClose");
        }

        @Override
        public void glanceDefaultUIVoiceAuthenticationRequired() {
            Log.i(GLANCE_TAG, "glanceDefaultUIVoiceAuthenticationRequired");
        }

        @Override
        public void glanceDefaultUIVoiceAuthenticationFailed() {
            Log.i(GLANCE_TAG, "glanceDefaultUIVoiceAuthenticationFailed");
        }

        public void glanceDefaultUIDialogAccepted() {
            Log.i(GLANCE_TAG, "glanceDefaultUIDialogAccepted");
        }

        public void glanceDefaultUIDialogCancelled() {
            runOnUiThread(() -> {
                pbLoading.setVisibility(View.GONE);
            });
            Log.i(GLANCE_TAG, "glanceDefaultUIDialogCancelled");
        }

        // ATTENTION: only available from version 5.2.0.0 or higher
        public void glanceVideoDefaultUIDialogAccepted() {
            Log.i(GLANCE_TAG, "glanceVideoDefaultUIDialogAccepted");
        }

        // ATTENTION: only available from version 5.2.0.0 or higher
        public void glanceVideoDefaultUIDialogCancelled() {
            Log.i(GLANCE_TAG, "glanceVideoDefaultUIDialogCancelled");
        }
};
Video UI
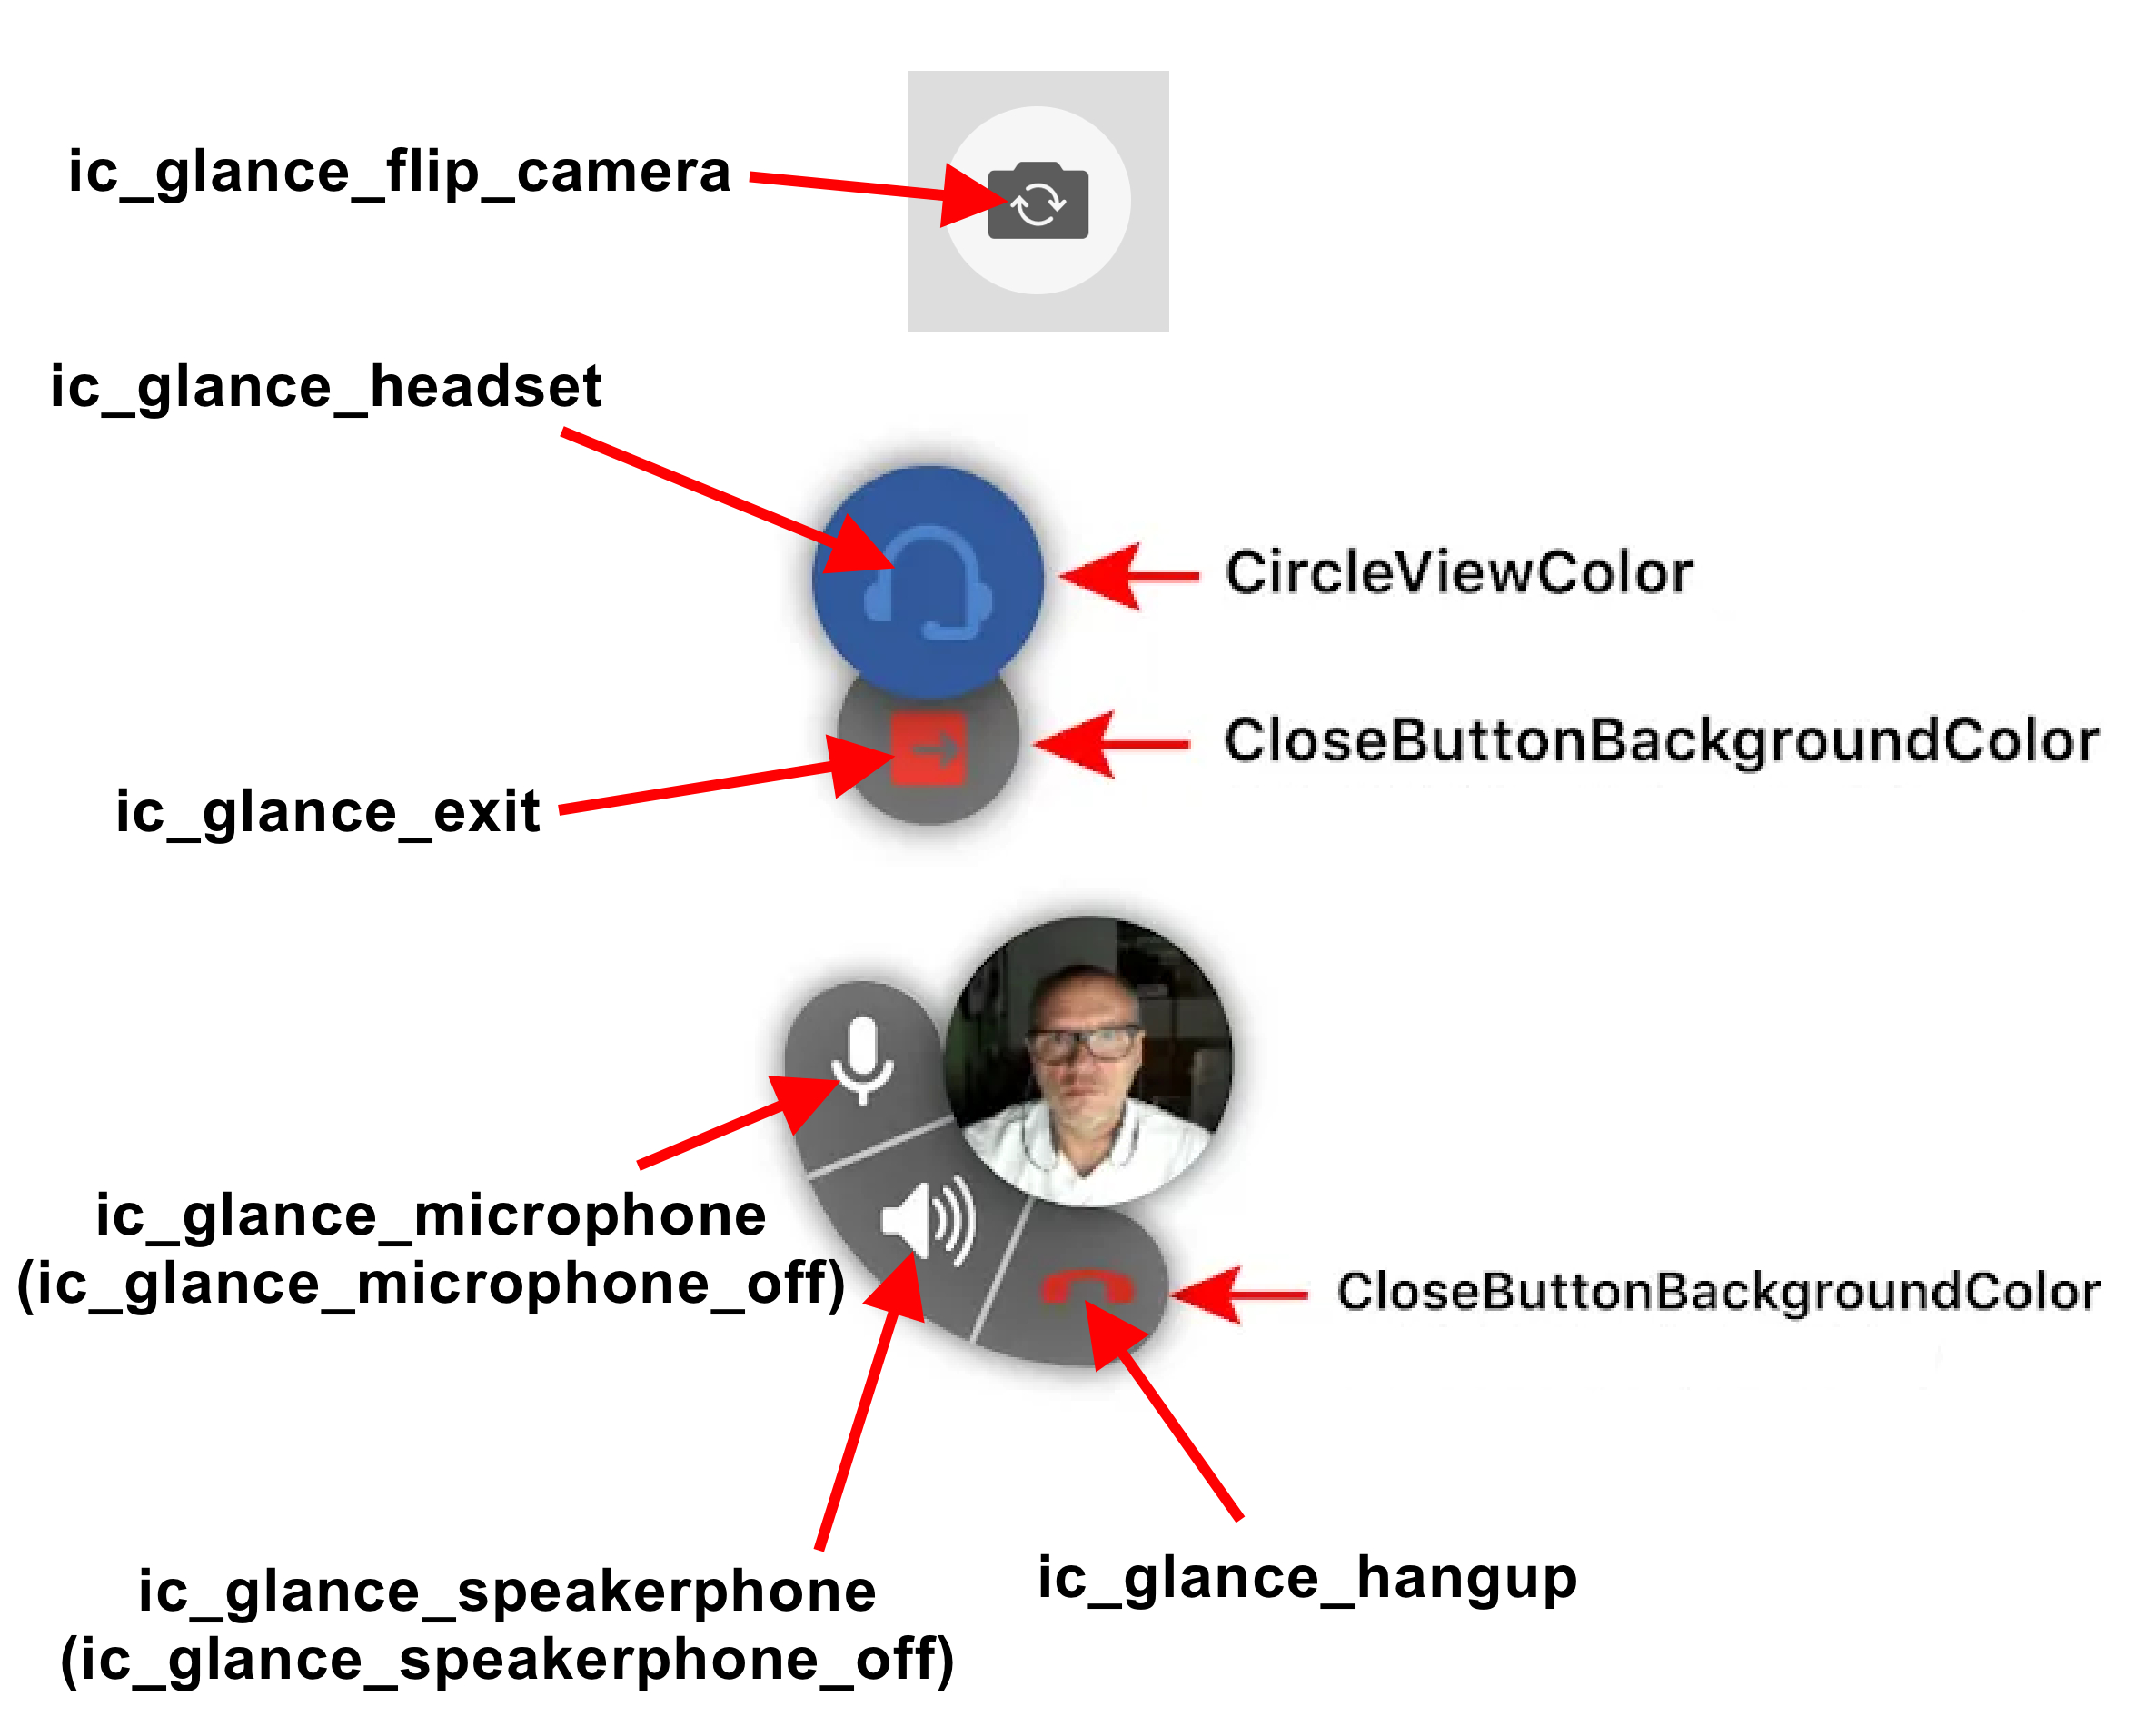
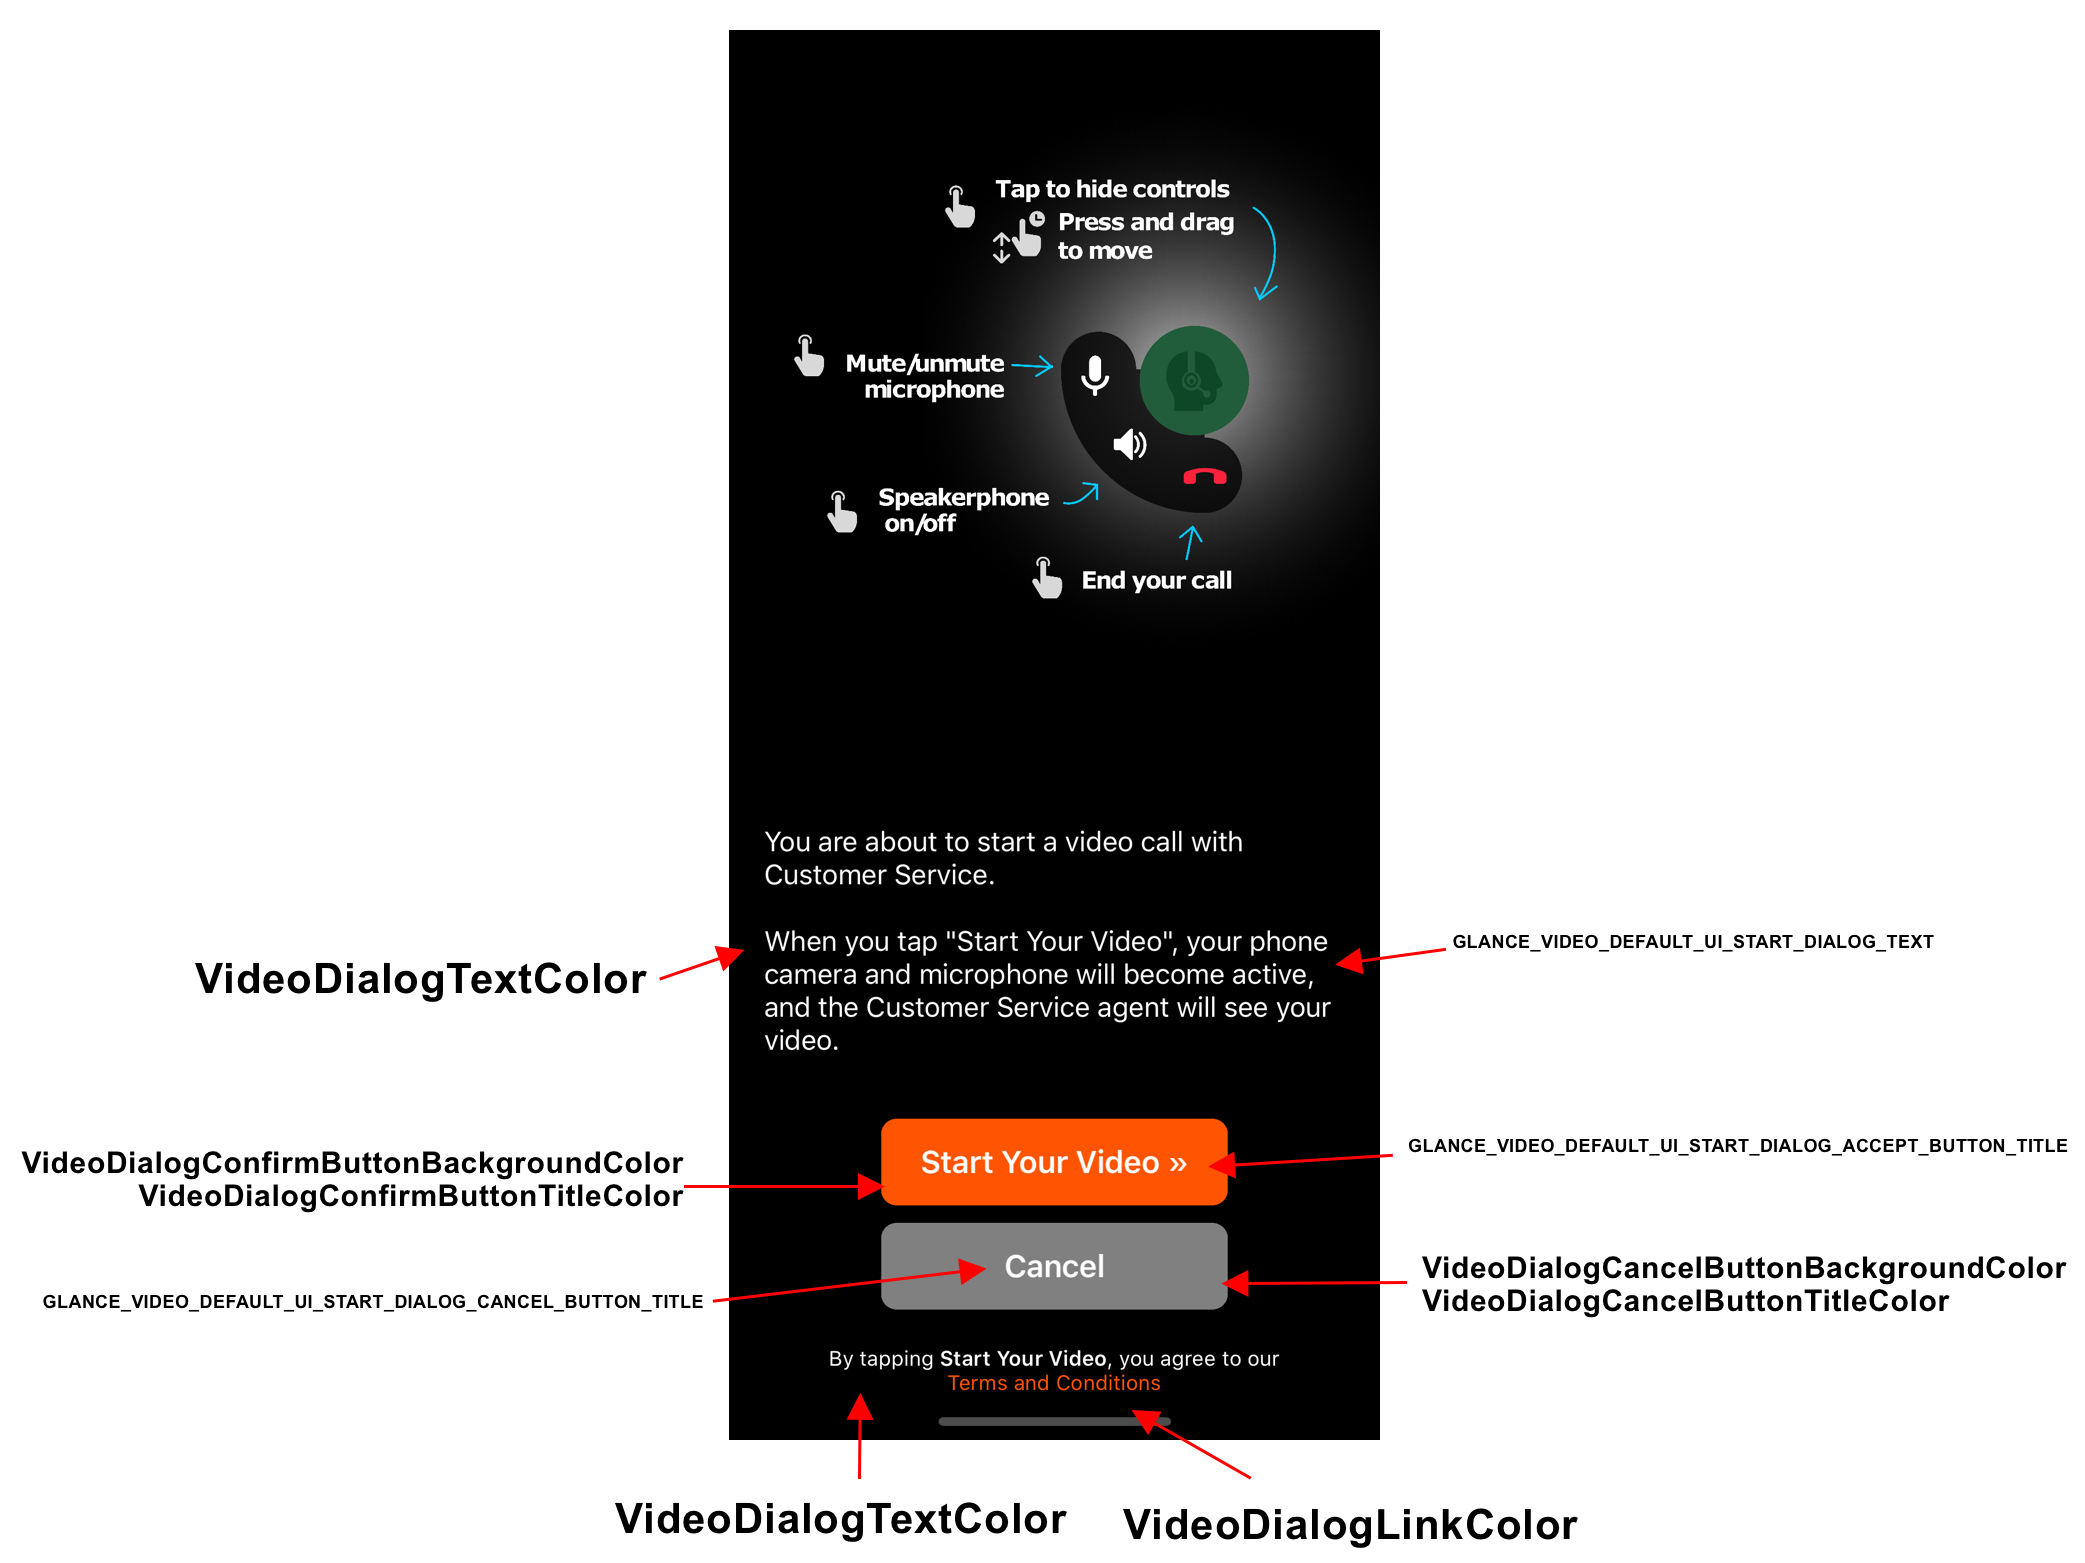
For now, you can only change colors, strings, and some images icons on the video UI. Find more details below:
-
To set various colors used by the default UI, add them to your
res/values/colors.xmlfile, using constants found in the images below. -
To modify the UI text, update your application’s
res/values/strings.xmlfile, using constants found in the images below. -
To override images, add your custom images (SVG format) to the
res/drawablefolder by right-clicking on drawable and selectingNew > Vector Asset. Name the image using the constants in the image below:
Voice UI
As well as for the video UI, you can only change colors, strings, and some images icons on the video UI. The steps are the same.
Also, to integrate the Voice capability on your app, please check the Voice demos.
Presence UI
For presence, it will be only possible to customize the requests confirmation and show Terms and Conditions UI. The URL to a Terms web page is configured in the agent-side CRM system.
Q&A
-
I've already had called
Visitor.defaultUI(false);andVisitor.setCustomSessionViewId(R.id.glance_agent_viewer);but I'm still not able to see my custom Agent Viewer layout.
A.: check if you haven't forgotten to add the<include layout="@layout/agent_viewer"/>line in your MainActivity layout. -
I've set all configurations needed to customize the AgentViewer view, but the view is not draggable.
A.: you need to implement theView.OnTouchListenerfor this to work. Check our sample of how to do it. -
I've implemented a different shape for my custom AgentViewer view, but it is being shown in a square shape.
A.: check your view class implementation. Using Canvas, Path and Paint in Android is always challenging. -
I've overridden the default UI and video UI dialog button colors values, but they are not changing.
A.: check your defined themes are extending any Material Themes or other similar, because they may prevent the buttons to use our defined color keys.