
SAML SSO for AD/FS
Glance offers Secure Transparent Signon to our services. Follow these instructions to add a Relying Party Trust to your AD / FS instance for Glance services.
The Glance Cobrowse service and website is a SAML 2.0 Relying Party. Glance customers with on-premises Active Directory / Federation Services may use it to authenticate their subscribers to Glance services.
Glance does not support SAML Logout.
Prerequisites
Before you begin:
- Your enterprise must use Active Directory / Federation Services, and you are the Windows Domain administrator. Make a note of the URL for your AD / FS Metadata Discovery Endpoint. It looks something like this:
https://adfs.example.com/FederationMetadata/2007-06/FederationMetadata.xml. - You need an enterprise account on Glance, and you should ask Glance Customer Success to furnish your idpid value, also known as a group id value. It is a number like 999999.
- Your Glance enterprise account must have some subscribers in it. They need to be identified by email address or the field Glance calls Partner User Id. These identifiers come from the LDAP server in your Active Directory installation. Your AD / FS server sends them to Glance, and Glance uses them to identify your users.
Many customers have Active Directory User Principal Names (UPNs) that are the same as user email addresses. These are often a good choice for the shared identifier.
- Make a note of the URL for your AD / FS Metadata Discovery Endpoint. It looks something like this:
https://adfs.example.com/FederationMetadata/2007-06/FederationMetadata.xml - You may find it helpful to install two web extensions in your Google Chrome browser. The SAML Message Decoder shows the contents of SAML AuthnRequest and Assertion messages. Edit this Cookie shows the contents of browser session cookies and allows their easy deletion.
Choose a Method to Identify Users
The way you identify your users is up to you. You have these choices for a unique identifier for each user:
- By email address. Some domains employ User Principal Names (UPNs) for E-Mail addresses, and others have a separate attribute. Either one is satisfactory.
- By an arbitrary identifier, such as an employee badge number, you furnish. We call this a Partner User Id. This can, at your choice, be the same as E-Mail address or Glance Address, or some different value.
- By Glance Address (values like emp1234.example.glance.net).
You add your users to Glance by preparing a comma-separated values (CSV) file looking something like this:
FirstName, LastName, Email, GlanceAddress,PartnerUID
Stephanie,Grant,stephanie.grant@example.com,sgrant.example.glance.net,e0001
Bella,Greene,bella.greene@example.com,bgreene.example.glance.net,e0023
Dorothy,Bond,dorothy.bond@example.com,dbond.example.glance.net,e0245
Hannah,Greene,hannah.greene@example.com,hgreene.example.glance.net,e0018
Gavin,Nolan,gavin.nolan@example.com,ngavin.example.glance.net,e0008
To upload the CSV file:
- As an Administrator, go to Portal> Add Users.
- Under Upload a list of new users, select the CSV file.
- Click Upload. Contact Glance if you need assistance.
Notice the user attributes for the first example user, Stephanie Grant:
- E-Mail Address: stephanie.grant@example.com
- Glance Address: sgrant.example.glance.net
- PartnerUID: e0001 (this may be a badge number or similar value defined by you).
Before you configure claim rules on your AD / FS server, you must pick one of these attributes as a unique identifier for each user. Your claim rules retrieve your chosen identifier from your LDAP server and sends it to Glance in the authorization token. Specifically, the identifier appears as an Attribute in the SAML
So you must include the user attribute that uniquely identifies each user both in your CSV file and in your claim rules.

NOTE: Beware identifiers with values like "000144616:" Microsoft Excel strips leading zeros, so your CSV files may contain identifiers as "144616" even though your directory contains them with the leading zeros. This mismatch prevents Glance from correctly identifying your users. Consider using the Calc program from openoffice.org if you must manipulate this kind of value in your CSV files; it does not strip the leading zeros.
Integrate Glance with your AD / FS Server
To integrate Glance with your AD/FS server:
- Provision your enterprise account on Glance to integrate with your AD / FS.
- Create a Relying Party Trust in your AD / FS server for Glance.
- Create appropriate claim rules for your chosen unique identifier.
- Test the integration.
Once the integration is complete, it generally does not need to be revisited until the encryption certificates need replacement.
These instructions assume you are using email addresses as your unique identifiers.
Provision your Enterprise Account to Integrate with AD / FS
If your Glance account is configured as an administrator you can do this yourself, but please do not hesitate to ask Glance Customer Success for help.
- Go to the SETTINGS tab (https://www.glance.net/account/AccountSettings.aspx ), scroll to the bottom, and choose Manage your single signon settings.
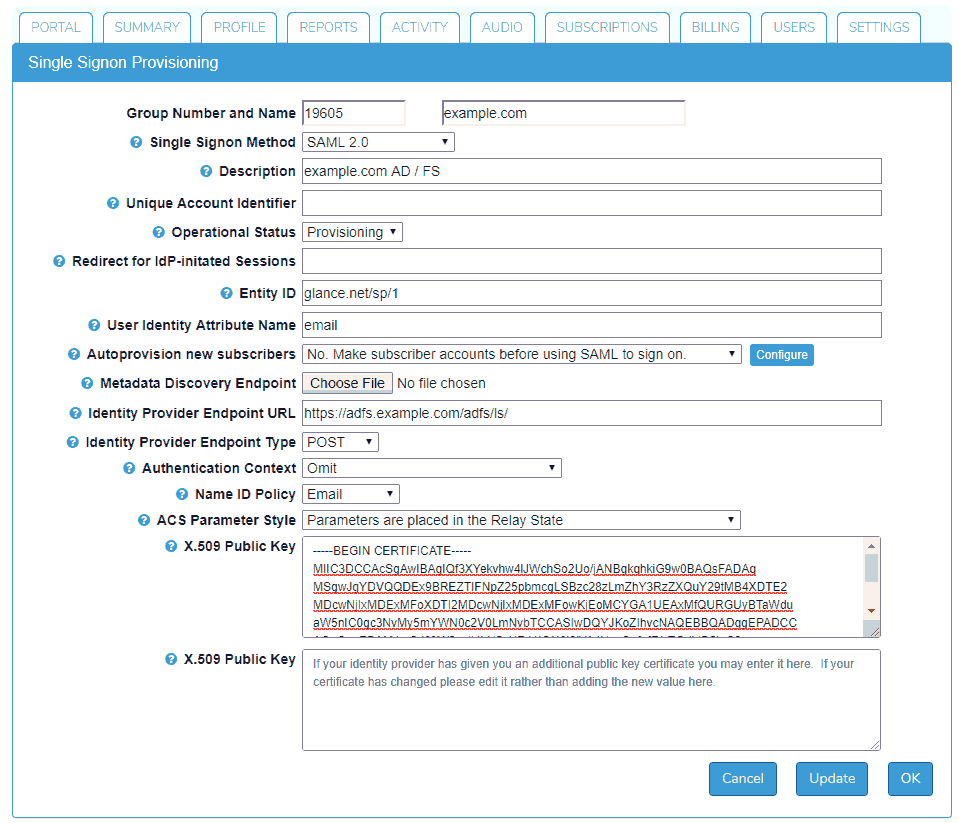
- Choose a Single Signon Method of SAML 2.0.
- Provide a Description for the configuration.
- Then click Choose File for the Metadata Discovery Endpoint. Paste the URL for your Metadata Discovery Endpoint into the File Name box and click the Open button. Then click the Update button. This fills in several provisioning items.
- Next, you need to set several more items:
- User Identity Attribute Name should be usually be "email".
- Authentication Context should be "Omit."
- Name ID Policy should be "Email."
- ACS Parameter Style should be "Parameters are placed in the Relay State"

- Click Update once again.
Create a Relying Party Trust
Follow Microsoft's instructions on creating a relying party trust.
Select the Relying Party Trusts folder in the AD FS Management console, and use the Actions sidebar to add a new Standard Relying Party Trust. This starts the Add Relying Party Trust Wizard.
- On the Select Data Source screen, select the last option, Enter data about the party manually.
- On the Specify Display Name screen, enter an appropriate value such as "Glance Networks."
- On the Choose Profile screen, choose AD FS profile.
- Skip over the Configure Certificate screen.
- On the Configure URL screen, choose Enable support for the SAML 2.0 Web SSO protocol Using your idpid value in place of 999999, enter
https://www.glance.net/account/GetLoginKey.aspx?idpid=999999
in the Relying party SAML 2.0 SSO service URL box. - On the Configure Identifiers screen, enter glance.net/sp/1 into the Relying party trust identifier box[^1] and click the Add button.
- On the Configure Multi-factor Authentication Now? screen, choose an appropriate value for your organization.
- On the Choose Issuance Authorization Rules screen, choose Permit all users to access this relying party.
- On the Ready to Add Trust screen, check the box marked Edit Claim Rules and click Close.
Create Claim Rules
Now that your Relying Party Trust is set up, your next step is to create an appropriate claim rules. You must create a pair of rules, one from each of these templates:
- Send LDAP Attributes as Claims
- Transform an Incoming Claim
Use the following steps in the Edit Claim Rules screen.
- Click Add Rule….
- On the Select Rule Template choose Send LDAP Attributes as Claims from the Claim rule template dropdown menu.
- On the Edit Rule screen * Put an appropriate name into the Claim rule name field. "Email" or "UPN" might be appropriate names. * Choose Active Directory from the Attribute store pulldown menu. * From the LDAP Attribute dropdown menu choose an appropriate LDAP field. E-Mail-Addresses or User Principal Names might be good choices if your chosen unique identifier is E-Mail. If you are unsure about this choice, consult your Active Directory domain manager. * From the Outgoing Claim Type dropdown menu choose E-Mail Address. Or, if you have chosen some other unique identifier, like badge number, pick an appropriate type for that, and Click Finish.
- Back on the Edit Claim Rules screen, use the following steps.
- On the Select Rule Template choose Transform an Incoming Claim from the Claim rule template dropdown menu.
- On the Edit Rule screen
- Put an appropriate name into the Claim rule name field. "Email Transform" might be an appropriate name.
- From the Incoming claim type pulldown menu, choose E-Mail Address. Or choose the same value as you put into the Outgoing Claim Type for your first claim rule.
- From the Outgoing claim type pulldown menu, choose Name Id. Or choose Unspecified or some other value if you have chosen some other unique identifier.
- From the Outgoing name ID format pulldown, we recommend you choose Email. This choice must match the Name ID Policy setting in Glance's provisioning screen.
- Choose Pass through all claim values, and click OK.
- Back on the Edit Rule screen click OK again.
Identity Provider-Initiated (IdP-initiated) SAML SSO via AD / FS
You may want your users to initiate their Glance sessions directly from AD / FS, rather than using a Glance STU. To support both IdP-initiated and service provider initiated Glance sessions, you must make a small change to the Relying Party Trust configuration.
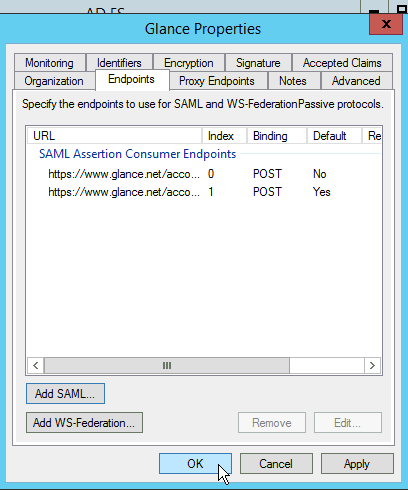
You must add a second SAML Assertion Consumer Service endpoint to the one you added in the Relying Party Trust Wizard (see above).
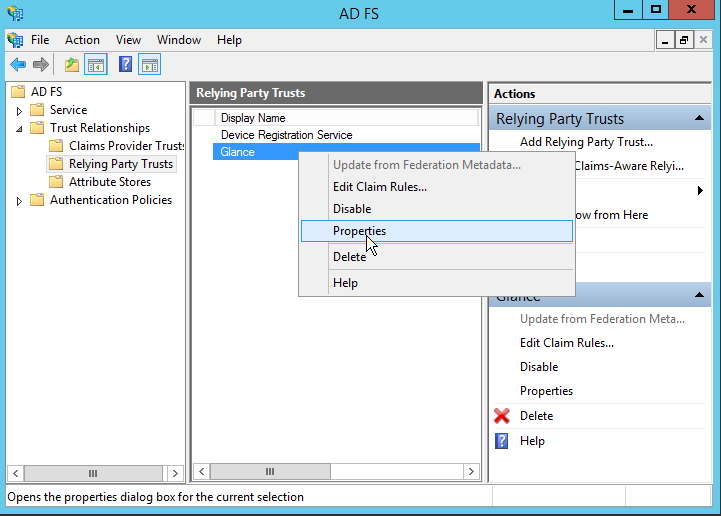
- To do this in the AD / FS Management Console, first find Glance's Relying Party Trust, and open its Properties box.
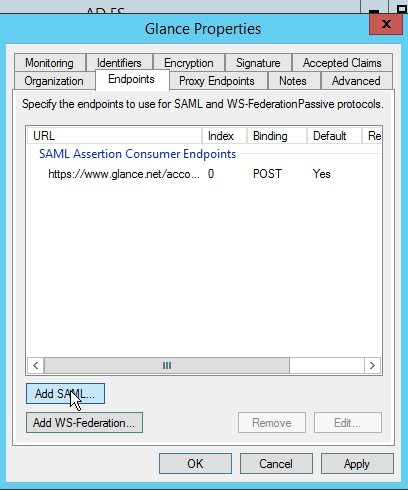
- Then choose the Endpoints tab, and click the Add SAML… button.
- Then add another endpoint URL. It is the same as the URL above with
&sso=1appended to it. In our example it would be
https://www.glance.net/account/GetLoginKey.aspx?idpid=999999&sso=1Make sure to set the Binding to POST and the Index to 1. Check Set the trusted URL as default.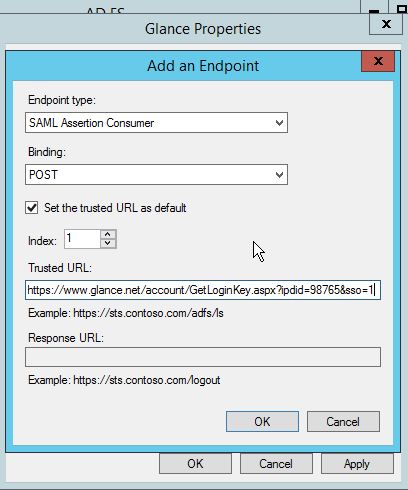
- Click OK. You should now see two items in the Endpoints tab. Click OK.


Test your Integration
- Make sure you have the correct idpid value for your Glance account. It is a number like 999999. We also call these values Group Ids. If you don't have this value ask Glance Customer Care to provide it.
- Issue this web request from your browser, using your own idpid in place of
999999.https://www.glance.net/account/GetLoginKey.aspx?idpid=999999&sso=1&test=11 - Your AD / FS will prompt you to log in.
- You will see a diagnostic page.
At the top of the page you can see the claim values (the SAML attribute values) presented to Glance by your AD / FS.
One field on the page shows the SAML Assertion token your AD / FS server sent to Glance's server. Other fields show such things as the Glance user associated with your AD / FS domain login (if one is found).
If you use identity provider initiated sign-on, test it. Enter the URL for your domain's AD/FS, log in, and choose Glance. The URL is this. Substitute your own AD/FS hostname for the one in this example.
https://adfs.contoso.com/adfs/ls/idpinitiatedsignon.aspx
Troubleshooting
If you need help troubleshooting your AD / FS integration please see SAML Troubleshooting contact Glance.
References
- Microsoft's documentation: Create a Relying Party Trust.
- SAML Message Decoder web extension.
- Edit this Cookie web extension.
- Glance Browser Extensions